The space for my studio in our new house is much smaller than it was in our previous house and every square millimeter needs to pull its weight. I like to use visual systems to keep myself organized and I needed a way to keep all of the paperwork associated with teaching and vending gigs, and their attendant travel arrangements, organized and attractively at hand. I also needed an out-of-sight place to store some of my packing and shipping supplies, as well as some gift-wrapping accessories. I started by analyzing available areas and finally settled on this area behind the door that you use to enter the studio. This door is kept open nearly all of the time, so the unused space behind it would be ideal for my make-over.
This is the before:
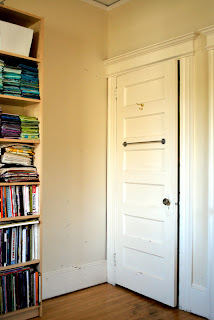
This space is definitely not living up to its potential! There's 3 feet of wall space and the entire back of the door just crying out for purpose. The wall is looking a little beat up and the trim could use some touch-up paint, but those are easy fixes. Since the walls are painted with flat-finish paint, a Mr Clean Magic Eraser takes care of most of the scuff marks. Remove the gold hook, patch a few holes and add a bit of semi-gloss paint on the trim and door, and we're good to go. I had hung up the one rod soon after we moved in but I kept thinking that more rods would be more useful. A trip to Ikea took care of that and I picked up 2 more rods, a package of hooks, and a few baskets to hang off of them, all from the Bygel series.
Here's the smooth-functioning after:
I drew inspiration for the clipboards from a few sources, most notably my co-author
Elin's similar clipboard system as featured in Quilting Arts Studios magazine a few years back, and for the hanging rods and bins on the back of the door from
Adventures in Renovating a Brooklyn Limestone's make-over.
The clipboards as-is were a little too boring, so I jazzed them up with a bit of hand-printed paper from an art supply store. First, I made a template of the shape I'd need to cover the surface of the clipboard by using a piece of cardstock and measuring, drawing and cutting until it was a perfect fit.
Then I traced around the template on 2 different printed papers and cut 3 of each for a total of 6 pieces. I was thinking this would be fun with 6 different papers too, but didn't want to stop long enough to run to the art supply store again.
Next, I used gel medium (Claudine Hellmuth's Studio MultiMedium is one of my very favorites) to adhere the paper to the face of the clipboard. After applying a thin and even coat, I pressed the paper in place, flipped the clipboard over and weighted it down so the paper would dry flat, leaving the clip hanging over the edge of the work table.
I wanted to have a way to label each clipboard and hide the brand stamped into the metal at the same time.
First I tried printing out labels and affixing them to the clipboard with magnetic tape. That was okay, but didn't look finished enough and I think the labels could have been knocked off fairly easily.
Another trip to Staples office supply store (for another 2 clipboards - I only started with 4 for some reason), found me wandering the new Martha Stewart supply aisle. Yum. There I found adhesive metal bookplates, coincidentally sold in packs of 6. Obviously meant to be!
They fit perfectly over the logo and in the space on the front of the clip.
Here's a look at the oh-so-pretty after again:
There's something about Spring, finishing up some projects for deadlines, and having a few weeks at home between trips that brings out the organizing bug in me. What have you organized lately? How do you tame the "paper beast" in your studio?


10 comments:
wonderful! and I recognized those Elin clip boards right away!
Ahhhh, Clipboards! Just what I need. Already have the Ikea rods with the hanging baskets AND lots of pretty papers I keep hoarding. Project Tuesday!
LOVE this idea! I have a similar area in the little bedroom I use for my study, and this would be a perfect solution. And, how exciting that Martha Stewart has an aisle at Staples! I will definitely be using your ideas. Thanks for the inspiration!
It looks great! I need to get organized, the vicious circle of can't find the time but waste time cuz I am not organized! Uggg
Thanks for some great ideas. I am currently working on getting my studio spaces under control.
looking good!
Love the clipboard idea! I have a bunch of them gathering dust in the basement from my teaching days. Now I just need to get crafty. It will be perfect to hold the patterns to refer to as I sew. Thanks for sharing your ideas!
I also enjoyed your talk at NSQG on Tuesday.
Helen
Really great job. Thanks for the detailed info. I think they would make great gifts.
I've been thinking about using clipboards to organize too (even have a few next to my desk waiting for me to step up to the plate). Now that I've seen your fabulous space, I've been inspired to get moving!
Post a Comment