10 February 2017

I'm Moving -- to a New Blog Address!

Please join me at my newly re-designed website and blog, now integrated into one.


Come on over to www.janedavila.com for all the latest news on products, workshops, books and magazine articles, and events.

This blog will remain live to preserve all of its great content, but all new posts will appear on the new blog.

Please remember to update your blog readers too. Thanks! See you at my new place. :)

01 August 2016

Moodboard Monday: Sewing Studio Storage

Organizing a sewing studio can be a tricky, and seemingly never ending, task. Today I have some unusual and unexpected ideas to help corral your bits and bobs, all while looking good!

For me personally, I want my studio space to be beautiful as well as functional. I want an inspirational space that isn't too visually distracting. A studio where everything has a place and I won't waste time hunting for supplies and tools. And especially a place where I can focus on the work and not on how much I hate how disharmonious something looks or how hard something is to find.
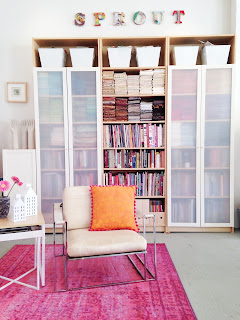


I spent almost two solid months last year going through every last thing in my studio, category by category. It was the first time in over 15 years and it was time well spent. I gifted or donated things I no longer needed. I threw away art that I wasn't happy with, and I evaluated everything. And everything that stayed now has a home, I can lay my hands on anything at a moment's notice, and I make a concerted effort to put things back when I've finished using them. All of this is saving me time, aggravation, and money. It used to be easier to just buy another ruler/spool of thread/thread snips if I had searched all day and wasn't able to locate it. Need a blue seed bead or a gold ear wire, yeah, I've got that right here!


Because my studio is outside of my home in an old factory the public is frequently invited in, through workshops that I offer, a mentorship group that I lead, or during open studios that all of the artists in the building participate in. Plus my studio is a place where I spend a lot of time and I prefer spending it in a space that is pleasing to look at. My space is not only designed for working but can also be a classroom and a showroom (and a place to hang out and talk about art and eat ice cream, as one does...)

I've rounded up some containers and organizing items that you might find helpful when organizing your own studio. Links are provided below.


1. Bisley 5 drawer cabinet - This metal cabinet is the perfect size for a tabletop and the flat drawers hold a ton of little items like beads, threads, scissors, and more. There are even inserts for the drawers  available with different configurations of compartments to sort all of the little stuff out. Plus the cabinet comes in a range of luscious colors!

2. Rotating hardware bin - This metal bin spins around and can keep spools of thread, flosses, buttons, paint bottles, and glues right at your fingertips. 

3. CD or DVD cabinet - if you collect fat quarters or other small yardage amounts of fabric, then a CD cabinet can be your best friend. A cabinet like this uses less than a square foot of floor space, but holds a ton of fabric (neatly folded and easy to see, select, and use).

4. Picture ledge - Don't neglect the wall space when organizing supplies! A picture ledge or two (or four!) can easily store paint bottles, spools of ribbon, large cones of thread, and much more without using any floor space.

5. Glass curio boxes - lidded boxes can be beautiful to store colorful and pretty supplies like thread, washi tape, ribbons, even scraps of fabric. And the lids keep the dust out.

6. Watchmaker's cases - these little tin cases are ideal for beads and findings. The clear tops make it easy to find exactly what you're looking for, and they're so shallow that it's easy to scoop beads right out of them as you're working. They're available in a lot of diameters. I have four drawers full of beads in these cases in my studio and I LOVE them!

7. Sugar dispenser - this one is a little weird. I know you're wondering why and how, but stay with me. The humble yet classic sugar dispenser is perfect for twine, string, yarn, and thin ribbons. Simply pop a cone of string into the dispenser and feed one end through the pop-up top. Pull out what you need, trim it off, and leave the end sticking out and ready for next time. They're inexpensive so this is an extremely cost effective organizing tool, especially if you have a lot of string, yarn, or twine and use it frequently.

8. Magazine racks - using the wall space again, you can keep reference books, patterns, and magazines at hand with a magazine rack or two. Bonus points if there's a label holder on the front of the rack so you know what's where!

9. Kitchen rail systems - another storage-on-the-wall device, this time using a kitchen rail system. There are a wide variety of systems available with different components that you can add to them to create a system that's perfect for you. Use the hooks to hang rulers and scissors, cups can contain pencils and markers, shelves can hold pin cushions or adhesives.

A terrific and free space planning tool available for desktop computers and tablets (and even smartphones) is Roomle. You measure your room and then draw the walls of your space, add windows and doors, and then add furniture. You can resize the furniture to duplicate what you have (or what you're planning to acquire), then drag it around, rotate it, and figure out how best to lay out your studio. You can duplicate and save multiple versions of the same room to help decide which might work best for you. It certainly saves your back from actually lugging all of the furniture around! You can even switch to 3D mode and take a virtual walk around your room to see how it feels.

If you're looking for even more ideas for pretty studios and storage solutions, please visit my Studio Inspiration Pinterest board for more thoughts (and lovely pictures). What's your favorite unusual storage gadget? Scissors in a knife block? Bobbins in an ice cube tray? I want to hear all about it. Together we can organize all the things so we have more time to sew and paint!!


25 July 2016

Moodboard Monday: Here comes the sun(room)!

Do you have a sunroom, also known as a Florida room? I had one in my previous house and I commandeered it for my studio. It was a big, gloriously light-filled room with walls of windows on three sides and four skylights overhead. Most sunrooms in colder regions of the US, like here in the Northeast, are considered 3-season rooms, sometimes because they lack a heat source, and sometimes because all of those lovely windows make it difficult to keep warm. I consider it a fair trade-off to have a room flooded with sunlight that's usable most of the year.


As I mentioned in a few previous posts, I've taken on some interior decorating clients and am having the time of my life. I love flexing my creative muscles, whether by designing and printing my own fabrics, teaching a class full of eager surface design students, or heck, even decorating cookies. Mmm, cookies... One of my favorite things to do for a client is to create a moodboard of the space they'd like help with. A moodboard is a mock-up of the major elements of a room so that the client and I can visualize what the finished room will look like. I decided to imagine that I was decorating a sunroom for myself and created the moodboard pictured here.

A lot of people tend to decorate a sunroom with a tropical or beach theme, but I prefer something more "placeless", a room that would fit in with the rest of my house, which isn't at all tropical or beachy. I would want it light and airy, breezy, and inviting, while remaining true to my modern, eclectic, artsy, global vibe. If you're decorating a sunroom, here are a few things for you to think about when choosing finishes, furniture, and accessories.

  • Consider lightening the floors - a bleached wood floor is light and airy looking and helps reflect all of that gorgeous sunlight.
  • Choose durable fabrics and materials - an indoor/outdoor carpet is a perfect choice for a sunroom.
  • Pick a light, pale color to bounce back as much of that natural sunlight as possible. Pay attention to the undertones in the room - do the colors of everything else in the room lean toward yellow, or red, or green, or blue? Try to match those undertones as best you can for the most harmonious result. For example, nearly all of the blues in my moodboard (from the walls to the rug to pillows to the painting) have a dose of green in them.
  • Add lots of texture for interest - smooth surfaces like glass or metal, nubby fabrics like raw silk and linen, rattan or wicker (in moderation or you'll tip over to tropical in a hot second!), and handwoven textiles for pillows and throws can bring another dimension to a room.
  • Make sure you have multiple light sources for after the sun sets too - a spectacular chandelier, a couple of floor or table lamps, and a few candles in lanterns can all extend the use of the room beyond the daylight hours.
  • Don't be afraid to mix wood tones or metal tones for a more eclectic look.
  • Use sheer linen or cotton curtains that will catch the breeze but stop the rays of the sun from getting in your eyes depending on the time of day. There's nothing so charming as a curtain gently wafting in a light wind.
  • Don't forget some plants and flowers to really bring the outside in, blurring the line further between outdoors and in.
  • Once autumn arrives swap out some of your easy, breezy accessories for ones with cozier textures like wool and velvet pillows, warm brass and gold accents, and more candles to maximum use out of what might end up being your favorite room in the house!

In case you're wondering where any of the items I've used on the moodboard came from, I've provided a shop-the-look list. Do you have a sunroom? Do you love it as much as I did mine? And don't feel sorry for me, my studio now is in an old factory so it has 10 foot ceilings and huge old factory windows - I'm still eating up that sunlight!! If you're looking for further inspiration, check out some sunny Florida real estate for additional ideas!


1. Shibori Dots Indoor/Outdoor Rug; 2. Antique Zinc Metal Riley Lanterns; 3. Seagrass Barrel Stool; 4. Capiz Lotus Pendant Chandelier; 5. Morning Walk Painting; 6. Hughes Sofa; 7. Ocean Basin Tray; 8. Perdana Coffee Table; 9. Sunshine Accent Chair; 10. Fransisco Wool Cube Pouf; 11. Amber Interiors Woven Pillows; 12. Diamond Star Gold Glass Vase; 13. Surveyor Floor Lamp
SaveSaveSaveSave

Printing on Fabric with Natural Materials starts now!

Does surface design summer camp sound like fun to you? Then join me in my online course Printing on Fabric with Natural Materials on Craft University! Registration is open through August 29.


The supplies needed are simple to find, non-toxic, and mostly inexpensive - and you'll be creating unique and interesting fabrics with everyday materials like artichokes, onions, ferns, lace, even fish!


Treat yourself, sign up with a friend, and work through the lessons. I'll be standing by to answer questions, lend encouragement, and dish even more tips and tricks.


Use coupon code PRINT20 for a 20% discount on the price of the class. See you at camp!


30 June 2016

Printing on Fabric with Natural Materials - online course!

Back at the beginning of May I took a trip out to the Denver area and recorded an online video workshop for Craft University called Printing on Fabric with Natural Materials. Working with the team there was a blast and I'm so proud of the content of this workshop.


In the workshop I teach you all about how to sun print with acrylic paints and inks, how to direct print leaves, fruits, and veggies, how to print 3D objects like seashells and bumpy leaves, how to print fish, and even how to print your own photos with UV reactive dyes.


The team put together a preview of the workshop and you can watch it here:


Printing on Fabric with Natural Materials starts on July 25 and runs through Sept 5, but you own it forever, in case your summer gets busy. But! If you want to play along in real time, I'll be around to cheerlead, answer questions and troubleshoot, and share some more fun tips, tricks, and resources. You all are encouraged to post photos from the lessons and ask as many questions as your heart desires. I'll be right there guiding you!


You can use coupon code PRINT20 to save 20% on the course, and I'll be giving away a free gyotaku rubber fish for printing on Facebook and Instagram, so make sure you friend and follow me there too!

Summer is the best time to Nature Print - head out into the backyard to gather some supplies and then come join me in class!

21 December 2015

Loft Office Design

Carlos and I recently moved to an old loft complex near our art studios. I've been mulling over the design of the new office/guest room space and have finally arrived at a plan.


Things may change a bit as the room comes together, but it feels good to have the general direction decided upon. The first step will be painting the walls a warm white (already started!), followed by building a desk the length of the room (11.5') with two work stations, and cubbies/shelves over it, like the inspiration photo in my moodboard above. I'll be on the lookout for a midcentury modern sideboard or dresser for another wall to house office supplies and give our guests a little storage space. A convertible sofa will be great for overnight visitors and provide a place for a snooze or some work, depending on the day. I desperately want to replace the current "boob" light in the ceiling with an updated sputnik-type chandelier and have found a great, reasonable source for it. Now to save up some pennies! Here's a quick "before" photo of the room (yeah, that green is outta here):


While the living and dining rooms of our loft have brick walls, wood beams, and lots of character, the bedrooms have less character and no bricks, but do have really high ceilings and are large rooms. The furnishings and textiles in the office/guest room will give it the character that it needs.

Here are peeks of the living, powder, and dining rooms for a hint of that charming loft character.


I'll share progress photos and furniture building and sourcing tips as we go, so please check back!


20 December 2015

Tiny Beetles

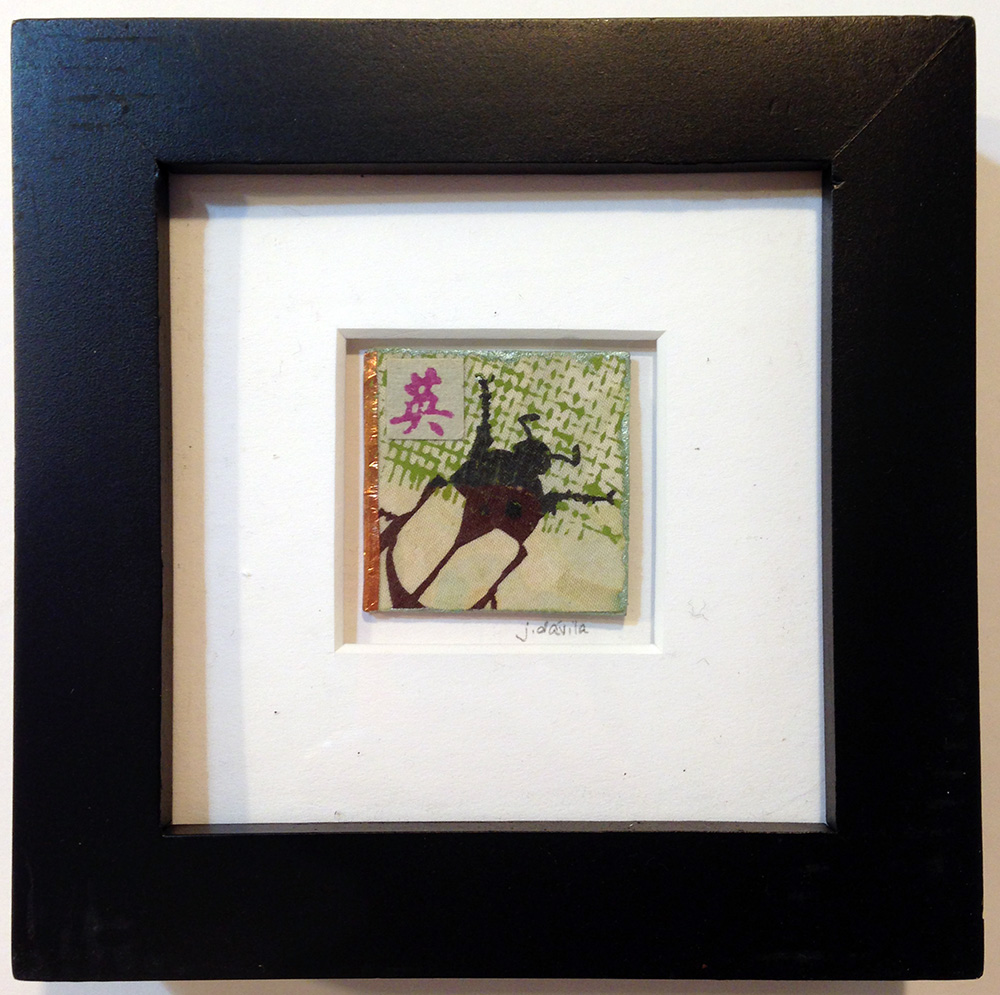
Now that I've shown you my giant beetles, I'd like to show you some tiny beetles. Each of these beetles is 1.5" square and framed in a 4" square frame with a custom-cut mat.


A few of these tiny beetles have copper tape wrapped around one edge, all have stamps or "chops" on them, as well as a design stamped from a bit of metal screening material and acrylic paint, for texture. 

Each is $25 framed and an additional $5 shipping but I'm offering free shipping through the end of the year, so if one of these tiny beetles needs to live at your house, don't wait!

11 December 2015

Giant beetles!

As promised yesterday, here is a recent piece with two seriously big beetles. "Elfreth's Alley" is a mixed media collage with stitching on a 36" x 48" stretched canvas.

This is the first in a series of at least 8 new works, all depicting large-scale insects. I've sketched out the next four already. The one I'll start next has a big-ass moth on it. This is a fun series to construct because I'm having to invent methods and techniques to make what's in my head work in real life. I'm enjoying the unexpected turns that this project is taking me. Check back for more progress and updates!

10 December 2015

Swarm - new art cloth

Sorry about missing the last couple of days of blogging, there was nothing blog-worthy going on over here! Today I hung up a new piece, Swarm, outside my studio. It just returned from a show at the View Art Center in Old Forge NY.

The piece is art cloth (no batting or backing) that started as plain white heavy cotton. First I painted it with a diluted acrylic ink wash. Second I blockprinted with a mustard acrylic paint a series of geometric blocks that I'd made previously. Next I screen-printed a swarm of beetles with a thermofax screen and an opaque navy acrylic paint And finally I added some hand stitching with coral linen floss. It's 18" x 36" overall.


I've been on a beetle kick for a number of years now. I find their forms so intriguing, and they've come to symbolize how I feel about climate change. Beetles are at once formidable and fragile, much like the earth herself.

Tomorrow I'll show you my recent gigantic beetle piece - each beetle is over two feet long!

07 December 2015

Art Business Housekeeping

December is a busy month for most people, but it's also a good month to attend to some year-end art business housekeeping tasks. Steal away 15 minutes here and there and you'll be off to a great start when January rolls around. Here is my list of suggestions of categories to work on this month, one at a time, as time allows.


Update your website
Most of us finish our website and then stop thinking about it once it's published and uploaded. If you haven't updated yours in a while to reflect new work, a current calendar, new workshops, etc, take a bit of time and make certain it's up to date. Pro Tip: Set a reminder on your phone to update it at the end of every quarter (or more often!) Websites that are updated regularly rank higher in search engine results than websites that are stagnant.

Review your business cards and other promotional material
Business cards often need updating too. Sometimes the image on it might not reflect what you're currently doing, or you might have a new blog or a new email address. Take a business card or postcard out now and check to see that everything on it is up to date and that you're happy with it. If not, spend the time to correct it. Then order new ones so you have them on hand for all of the holiday gatherings you'll attend. Pro Tip: My favorite place to order business cards and postcards is Moo.com. The cards are high quality, you can have different images on each card for no extra cost, and their "moosletter" is chock full of great info for marketing and promotion and they offer coupons and discounts. Get 10% off your first order with this link.

Update your mailing list
When I go away to teach I take a notebook with me so I can collect email addresses from my students for my email newsletter. What I often forget to do when I get home is transfer those names to my emailing list program (I use Mailchimp). December is a great time to make sure that your emailing lists are up to date Pro Tip: If you haven't added a widget for an emailing list sign up to your website yet, now is the time to do it. And if you haven't signed up for my newsletter yet, please do!


Update your Etsy store or online selling platform
Check to make sure that all of your listings are up to date, your prices are correct, and shop and shipping policies are current. Pro Tip: Review your descriptions and labels. These two things are the most important (after good photos) in getting found and getting sales.


If you'd like to join my online mentorship group with tips, tricks, and homework like this all year, please sign up for my mailing list above to receive notification of when it starts in early 2016! 

06 December 2015

Custom Built-in IKEA Billy Bookcases

One of the more fun projects that I've tackled lately has been customizing some IKEA Billy bookcases for a client. I've got the skinny on how it came together, in case you'd like to try something similar. I don't have the glamour-shot "after" photos yet with the perfect styling and the new rug so I'll be sure to update this post when I do.

We started with four of IKEA's ubiquitous Billy bookcases in a space off of their kitchen that was newly designated as a library.


They had just purchased new comfy reading chairs and wanted to use their existing pedestal table. I created a moodboard, or collaged image, of what their space could look like with some changes. We knew we wanted a new rug and lighting above the bookcases, as well as some fun detailed woodwork.


We were on track for a cosy area to read and relax, except for one minor detail. Behind all of those bookcases was a length baseboard heating, causing the bookcases to sit out from the wall about 6" and not allowing us to anchoring the bookcases to the wall to prevent toppling. So I built a base or platform for the bookcases to sit on from 2 x 4s bolted securely into the framing of the house and the floor below. This ensured that there was no weight on the heater itself and that the bookcases would be supported and flush against the wall. I also ran electricity from the existing outlet to a new switch that would be hidden inside a shelf and a new outlet near the ceiling for the lights that would be installed above the bookshelves.


Here are all four bookcases securely fastened to both the newly-constructed base and the wall behind them. They are also screwed to each other in a number of places for stability and to keep all of the front edges even. I used metal L braces on both sides of the bottom of each bookcase to secure them to the 2 x 4s that they're sitting on. I like to build things rock solid with no possibility of failure, so I add fail-safes wherever I can think of them. It might be overkill, but I sleep better. 

You can see one light in place as a test, and the new outlet peeking out above the third bookcase. The homeowner had made a hole for a power strip in that same bookcase, but it didn't end up being in the right place for the new switch (which is camouflaged just to the right of it) so that got patched.


Once the bookcases were secured I created a soffit above with a frame of 1x2 pines and added  painted planks of wood in different colors, trimmed it out with moulding, and installed the four new lights. The switch inside the bookshelf behind a picture frame controls the lights. I loaded all of the books back on the shelves, staged the table with a vase and flowers, and stood back to admire the work so far.


So the top of the bookshelves looks great, the bookshelves themselves look fabulous, but the bottom is looking a bit unfinished. To remedy this, first I trimmed out the opening below each bookcase with pine and stained it to match the bookcases' finish. I also stained all of the visible parts of the 2 x 4s that make up the base (which hadn't happened yet in the photo below).


Because I wanted the heat from the baseboards to be able to reach the room (there is a wood burning stove just out of sight to the left, so it is really warm there, but still), I purchased metal grating to cover the openings below the bookcases without blocking the heat. I cut them to size and spray painted them oil-rubbed bronze. Those got nailed in place. Then I added trim around each of the grates, mitering the corners.


The fronts of the bookcases were also trimmed out in lathing strips over the areas where two bookcases meet vertically so that the units appeared more custom and built in. You could no longer see four individual bookcases, but rather one large unit. I added a 1 x 12" pine board to the left side of the last bookcase, notching around the baseboard, to complete the custom look (not pictured, but I'll take one from that angle the next time I'm there and post it). In retrospect, I should have painted the baseboard heaters (and maybe the floor inside the base) a dark brown color so they wouldn't be noticeable through the grating.


After using wood putty to fill of the nail holes, I stained everything with a Kona brown stain to match the existing finish on the Billy bookcases. It's hard to remember that the actual bottom of the bookcases is way up in the air, hidden under all of the trim work. Stay tuned for the stunning "after" photos!

05 December 2015

New Birds on Cradleboard

I created three new pieces recently for an exhibit at the gallery in the building where my studio is, NEST Arts Factory. One sold (and I didn't have a chance to take a photo), but I can show you photos of the other two.

These are collages of fabric, painted papers, and art paper, mounted on cradleboard. I really like the presentation of the cradleboard. It's sharp and clean, and easy to hang.


The pieces are 10" square and are named "raven" in various languages. The top piece is Corbeau, the bottom is Corvo. The piece that sold is Cuervo.

Cradleboard is a rigid surface with a wood frame (or cradle) on the back. The sides can be painted or left unfinished (you usually see solid wood or layers of plywood on the edges, either is pretty). It's available with different surfaces on the fronts, everything from canvas, gessoboard, board prepared for encaustics, clayboard, or unprimed, and in a wide variety of sizes and prices. Try it!

04 December 2015

Pattern Play

I've been experimenting with pattern in the studio lately. I designed and made some large blocks for block printing.


Often the first thing I'll do with a new block is print it out with black paint on white paper to play with the repeats and secondary designs.


Next I'll test out some paint colors on colored backgrounds. I start with white fabric and paint a wash of acrylic ink and water to achieve the color I want. Once the background is dry, I'll mix and apply paint to my block and start printing. Here are some recents results:


As you can see, I like to keep the colors fairly close in family, or neighbors on the color wheel. These designs will end up as home decor items (pillows, lamps, etc), wallpaper, and more. I think the rabbits are my favorites so far!


03 December 2015

A new website for Phyllis

I've just finished a website for a lovely friend, Phyllis Lee. Phyllis is a talented artist whose media are ceramics and drawing. Her work is though-provoking and rich in detail. Check out her website to see her wonderful work: www.phyllisleeart.com


If you'd like to work with me on a new website, or if you'd like to take a class with me in how to design a professional and pain-free website yourself, please get in touch!

01 December 2015

31 Day Blog Writing Challenge

The lovely Muppin, Cheryl Sleboda, has challenged bloggers to take part in her 31 Day Blog Writing Challenge and I'm jumping in. I'll be blogging each day this month (or doing my very best to, at any rate). If you've been neglecting your blog, like I have (!), and need a kick in the pants to get you going again, join us!

And because you can't have a blog post without a pretty picture, here's a pretty picture:


See you tomorrow!

08 November 2015

One Room Challenge - Week Five: The Home Stretch

This week in One Room Challenge news I've discovered that if you work all day on projects in your room that by the time you're ready to snap some pics you've lost the light and are reduced to taking iPhone photos with the room's lights on. Oof, sorry! You can catch up on all of the other participants of the One Room Challenge and read more about it on the Calling it Home blog.

This week I completed the desk area, updated a sorry-looking filing cabinet, and gave the room a touch of light-hearted whimsy.

My clients' filing cabinet had seen better days but I knew that a little TLC could perk it up and help it look like it belonged in the beautiful new room.


The filing cabinet was wood and had modern lines but it had suffered an uneven paint job while the top was laminate and had seen better days.


First up was touching up the paint with some glossy black latex paint and adding handles to the drawers. I couldn't find the shape and size handles I wanted in a gold finish so I bought silver and spray painted them. When I ran out of gold metallic spray paint after the first coat, I bopped over to Lowes for a new can. To my horror I discovered that the local Lowes no longer carries metallic gold Rustoleum spray paint. At all. WTH, Lowes? Every other metallic color is there, but even the shelf tag for gold is gone and the helpful paint department guy had no idea why gold was discontinued, only that it was. You guys need to get on that, Lowes, a girl's got to get her gold on!


Next up was constructing a new top for the filing cabinet. I basically built a hat that fits snugly over the existing top. It's made of ash and maple and stained a rich walnut color.


The squared off edges of the new top take it right out of the 80s and into this century, while also making it compatible with the room's mid century modern furniture. Check out the side by side difference.


The final touch was building a simple riser for the printer to sit on, that would store excess copy paper and add a pop of color to the desk side of the room.


The next project for this area was all about adding some whimsy into the space. My clients' son, the occupier of the room currently away at college, is a star athlete and has many sports trophies. I wanted to add a nod to the trophy idea without altering his actual trophies. I hunted down some vintage 4H trophies on eBay (see what I did there?) and went to town with an orangey coral spray paint.


I love the levity of the rabbits and the cheerful color they are now. Adding something fun and unexpected to a room gives it so much more personality and takes it away from catalog perfect and cookie cutter. Go bunnies!

If you remember last week, I marked out the location for two shelves over the desk. This week I hung them and added storage containers, art, and accessories. The shelves and brackets are from Ikea, as are the tailored, tweedy boxes.


The desk lamp is a placeholder until I can find something more interesting and I'm also on the lookout for a stellar chair.


Here's hoping that I (and all of the other ORC participants) can make it across the finish line next week. It's been a wild ride - and so much fun to see what the other participants are up to!