Showing posts with label insects. Show all posts

20 December 2015

Tiny Beetles

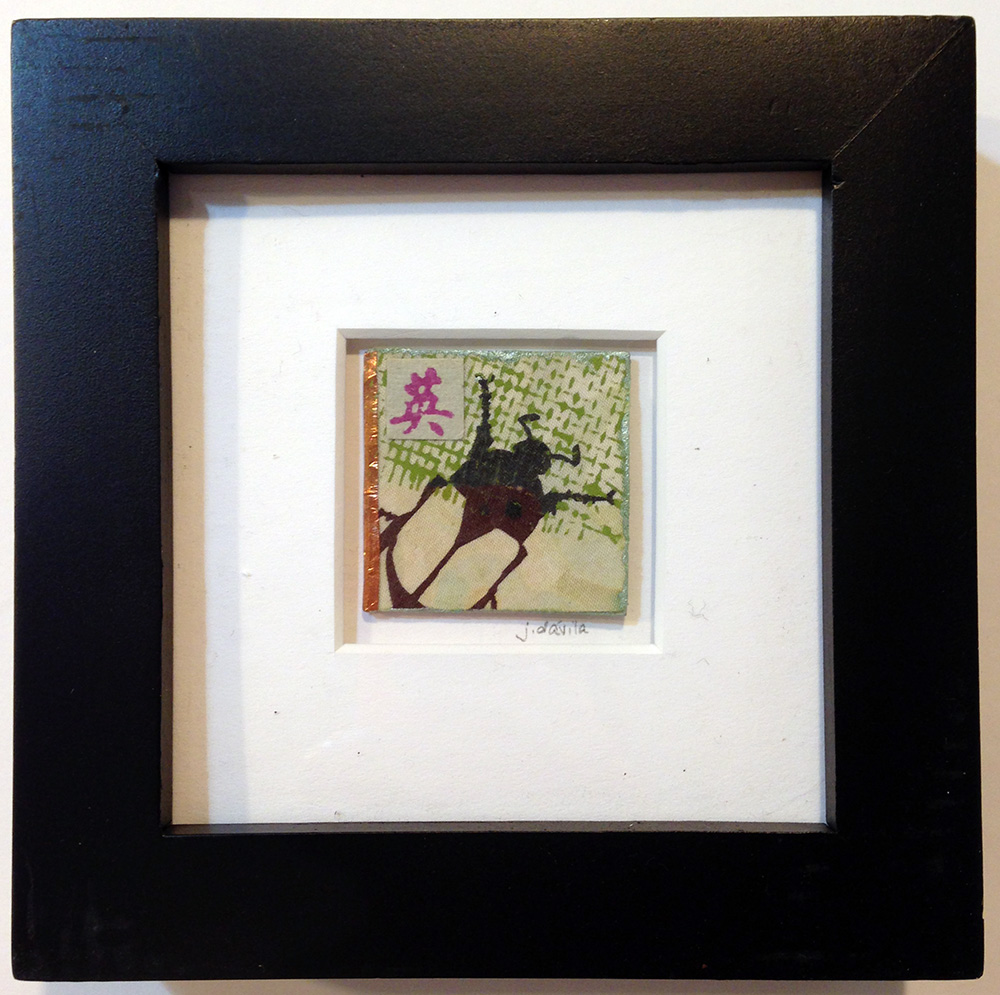
Now that I've shown you my giant beetles, I'd like to show you some tiny beetles. Each of these beetles is 1.5" square and framed in a 4" square frame with a custom-cut mat.


A few of these tiny beetles have copper tape wrapped around one edge, all have stamps or "chops" on them, as well as a design stamped from a bit of metal screening material and acrylic paint, for texture. 

Each is $25 framed and an additional $5 shipping but I'm offering free shipping through the end of the year, so if one of these tiny beetles needs to live at your house, don't wait!

11 December 2015

Giant beetles!

As promised yesterday, here is a recent piece with two seriously big beetles. "Elfreth's Alley" is a mixed media collage with stitching on a 36" x 48" stretched canvas.

This is the first in a series of at least 8 new works, all depicting large-scale insects. I've sketched out the next four already. The one I'll start next has a big-ass moth on it. This is a fun series to construct because I'm having to invent methods and techniques to make what's in my head work in real life. I'm enjoying the unexpected turns that this project is taking me. Check back for more progress and updates!

10 December 2015

Swarm - new art cloth

Sorry about missing the last couple of days of blogging, there was nothing blog-worthy going on over here! Today I hung up a new piece, Swarm, outside my studio. It just returned from a show at the View Art Center in Old Forge NY.

The piece is art cloth (no batting or backing) that started as plain white heavy cotton. First I painted it with a diluted acrylic ink wash. Second I blockprinted with a mustard acrylic paint a series of geometric blocks that I'd made previously. Next I screen-printed a swarm of beetles with a thermofax screen and an opaque navy acrylic paint And finally I added some hand stitching with coral linen floss. It's 18" x 36" overall.


I've been on a beetle kick for a number of years now. I find their forms so intriguing, and they've come to symbolize how I feel about climate change. Beetles are at once formidable and fragile, much like the earth herself.

Tomorrow I'll show you my recent gigantic beetle piece - each beetle is over two feet long!

03 August 2015

Printed Fabric Bee - Insects theme

I am the "Queen Bee" for the month of August of the Printed Fabric Bee group. That means that I got to choose the theme and the size for the fabric this month. Naturally, I chose insects as my theme.

Each of the Printed Fabric Bee members have made a 6" square fabric for me to giveaway to a lucky reader. If you would like to win these lovely fabrics, please leave a comment on this blog post, or on the Printed Fabric Bee blog before August 15 for a chance to win. Buzz on over!

Check out a sampling of the creative fabrics made by the members in this month's collage.


The guidelines to go along with my insect theme this month were an artist's choice of colors, with a touch of black. For my own fabric, I started by painting a solid white fabric with a wash of diluted Liquitex ink, then printed the hexagonal shapes on top with a yellow ochre Neopaque acrylic paint, and finally added the bees with another block print and a black Neopaque acrylic paint. Bees are among my favorite insects for their industriousness, their strong community, and the beauty in the function of their honeycombs. What is your favorite insect and why?


Check out the other Bee member's blogs for insights into their favorite insects too!

Carol R. Eaton
Jackie Lams
Lynda Heines
Gerrie Congdon
Susan Purney Mark
Deborah Boschert
Jane Davila
Lisa Chin
Lynn Krawczyk
Leslie Jenison
Judy Gula 
Julie B. Booth


04 August 2014

Printmaking and more at Create Mixed Media retreat in Chicago!

I had such a great time teaching at the Create Mixed Media retreat in New Jersey in July that I'm doing it again in Chicago this month. I'd love for you to join me!

I'll be teaching four workshops. First up is the 4-color block printing class. You'll learn about design, registration for perfect prints, marketing and selling prints, and even cut your own mat. You can add some stitching by hand and/or machine. Everyone works on their own design and New Jersey's students came up with some stellar ones!


On Saturday I'll be teaching a class called Art Websites for Beginners. All you need is a laptop with wifi capability and some images of your work. There's no software to buy or download, no special knowledge needed. By the end of class you'll be well on your way to a beautiful website you can maintain and update yourself. We work on the websites in real time, one step at a time, until everyone is confident and ready to move onto the next step. In New Jersey we joked about having a hacker party with pizza and beer in the hotel lobby after class to keep working on our sites together. Fun!

Saturday night we jump into the Live Tweets class. This is a great introduction to soft sculpture and the results are delightful. Make a bird with fabric and paper that you've painted or printed yourself. What a fabulous way to show off your handiwork!


And on Sunday morning join me for a great inspirational exercise that ends up as a house with a bird on it in the Bird:House workshop. Randomly choose a "bird word" and create a collaged and stitched house to illustrate it. We talk about inspiration, the principles of design, and many construction techniques. The houses can either hang on the wall or sit in a wooden stand when complete.


The Create retreats are great fun, inspirational, educational, and a wonderful way to connect with our "tribe" while trying new things and meeting new people. I hope to see you there!

06 October 2011

Natural Solvent Transfers

Oh how I love Citrasolv natural cleaner and degreaser! Not only is it an awesome cleaner (you know, if we had time for cleaning!) but it is also a perfect solvent for transferring laser-printed images or photo-copied images to fabric or paper.


Supplies:
CitraSolv orange-based natural cleaner and degreaser
Toner-based laser print or photocopy (either black and white or color) printed onto plain copy paper, in reverse
Foam brush
Scissors
An old spoon or a burnisher
Paper or Prewashed fabric (the smoother the surface, the sharper the print)
Scissors

1. Cut the printed sheet apart into separate images, if you’ve printed more than one on the page. Make sure that the image is printed in reverse or mirrored as the transfer process reverses the printed image, This is especially important for text!

2. Place the image face down on the desired fabric or paper and hold firmly.

3. Moisten the foam brush with a small amount of CitraSolv. Be judicious, a little bit goes a long way. 


4. Rub the moistened foam brush onto the back of the printed image, being careful not to shift or wiggle the paper which will result in a blurry transfer.


5. Once the paper is saturated you will see the image start to show through the back of the paper. At this point, vigorously rub the back of the paper with an old spoon or a burnisher.

Tip: It can be helpful to work on a slightly padded surface. I often place a scrap piece of batting or an old mouse pad under everything.


6. Lift up one corner of your printed page to peek and see if the image is transfering. If it isn’t, let go of the corner and resume burnishing. If it has transfered, remove the printed paper.

Tip: Printed images can only be transfered once, so discard the saturated paper after you’ve completed the transfer.


7. If you allow the transferred image to sit out the CitraSolv will evaporate in a few hours. If you are in a hurry, cover the transfered image with parchment paper and lightly press with a warm iron. Make sure your work area is adequately ventilated as the odor will be concentrated and more intense with the heat of the iron.

 Finished piece with CitraSolv image transfer.


There are many different ways to transfer images and photos to fabrics and other surfaces. Using a solvent and a laser-printed copy is one of them. I prefer a natural, orange-oil-based solvent like Citra Solv for its non-toxic properties and its great smell. It’s essential that the image is printed on a toner-based laser printer or photocopy machine as an inkjet printer or solid ink laser printer won’t work.

09 May 2011

Housing Starts

Last year, the uber-talented and enthusiastic Kathy York got a brainstorm to gather a group of artists to create a village of Fiber Houses. The resulting village is so vibrant and interesting, isn't it?


I built three houses for the project and at the time I thought they were on the large side, but looking at the village now I can tell they're not. My houses are in the center right in the village above.
First side of my pointy house 
Second side of my pointy house

Side one of my squatty house


Side two of my squatty house

Side one of my tall house
Side two of my tall house

I had a lot of fun playing with roof lines and proportion. Maybe it's my frustrated architectural tendencies?
Each of my houses is composed of both fabric and art/found papers and incorporates some printmaking.


Following along on the rest of the blog tour to learn more about the houses and their artists.

Susan Else (website) May 2 http://www.susanelse.com/
Frances Holliday Alford May 3 http://www.franceshollidayalford.com/weblog/
Pamela Allen (website) May 4 http://pamelart.homestead.com/titlepage.html
Frieda Anderson May 5 http://friestyle.blogspot.com/
Lisa Call May 6 http://blog.lisacall.com/
Vickie Hallmark May 13 http://fiberartglass.blogspot.com/
Laura Wasilowski May 23 http://artfabrik.blogspot.com/

PS: Sorry about the wonky formatting in this post. Blogger is being a pain in the patootie and won't bend to my will this morning...

08 February 2011

ONE hundred collages

I am so honored to be taking part in Virginia Spiegel's latest fundraiser for the American Cancer Society. The plan is to sell ONE hundred collages on ONE Wednesday for ONE great cause. I made three collages and I'm excited to show you one below. You can see a preview of the fundraiser and read about how it works on this site.


The all-star team of contributing artists:
Natalya Aikens, Pamela Allen, Laura Ann Beehler, Liz Berg, Pokey Bolton, Laura Cater-Woods, Jette Clover, Jane Davila, Jane Dunnewold, Jamie Fingal, Gloria Hansen, Leslie Tucker Jenison, Lyric Kinard, Jeanelle McCall, Linda Teddlie Minton, Karen Stiehl Osborn, BJ Parady, Judy Coates Perez, Wen Redmond, Cynthia St Charles and Virginia A Spiegel


The big day is next Wednesday, February 16th. Please check out the work, it's all extraordinary and 100% of the proceeds go to ACS.

22 September 2010

Art on Exhibit!

I spent the morning hanging my solo show. I have been working all summer to get ready for this exhibit -- making new work, and matting, framing and mounting existing work. It was fantastic to see it all hanging together on big white walls!


The opening reception is tomorrow night, Thursday September 23rd from 7 - 8:30 pm. The exhibition is held at the Edward J Duffy Art Gallery at the Canterbury School in New Milford CT. The show runs through October 14 and the gallery is open to the public weekdays from 8 -3 and Saturdays from 8-12 or by appt (860-210-3800).


On exhibit are over 50 pieces, including the first public showing of the first half of the Loteria series and many other new works. I've discovered one drawback to working on a small scale - it takes a LOT of work to fill a gallery!

Many of the Loteria series are on display, as well as an assortment of gyotaku fiber and paper collages, insect work in a variety of formats, some new pieces inspired by cell phone photography and a few three-dimensional fiber houses.

I hope you can stop by!

06 April 2010

Workshop opportunity in New Jersey


There are a few spaces left in the Sketches from Nature workshop I'm teaching at the Garden State Quilters' Guild next Tuesday, April 13 in Chatham NJ. If you're interested please contact Becky at the guild to sign up. You don't need to be a member to take the class.

We'll be free-motion quilting with black thread and then adding acrylic ink to create the look of pen-and-ink drawings with watercolor effects. A really creative and easy process that looks more difficult than it is, this technique is from my new book, Jane Davila's Surface Design Essentials. The supply list is minimal and I provide all of the inks for use in class. I hope you can join me!


11 November 2009

AED - pile o' postcards


Today I finished up a pile of postcards that's been mostly done for a couple of weeks now. Finally. Tomorrow they go out in the mail. Finally.

08 November 2009

AED - impatient stamping

Today I learned what happens if you don't wait for your background to dry before you stamp on top of it.


The stamped images blur and sink into the damp background. This is useful information for those times when that is the effect I'm seeking, as well as a beneficial learning experience. And I did wait until everything was completely dry before I transfered the bee.

Good thing this project is Art Every Day and not Successful Art Every Day...

05 November 2009

AED - more sketching


Another thread sketch awaiting ink. Creative, but quick today...

03 November 2009

AED - sketching

When I was in Houston for International Quilt Festival demonstrating in the Open Studios of the Make It University section of the show, I started some thread sketches. I worked on a few of them today.

First I doodle on a sandwich of fabric and thin batting with a sewing machine and black thread to give the impression of a pen and ink drawing.


Then I add a diluted mix of Liquitex liquid acrylic inks to achieve a watercolor paint effect.


I play this weird game where I try to make the thread sketch with one continuous line of stitching - one start, one stop.


Sort of like doing a drawing and not lifting your pencil off the paper.


Since I'm so bad at regular watercolor painting on paper, I'm surprised at how much I like these and how much they look like I wanted them to look.


Okay, except for that one, which needs more pressing...

16 September 2009

4" square challenge

I showed you the beginnings of my 4" square challenge pieces here and now that the art is swapped I can reveal more of the process and the finished results.

After I had fused on the prepared-for-dyeing fabric to the 4" squares of fast2fuse interfacing, I applied a wash of acrylic paint diluted with water, mixing colors as I went.


Even after they dried they were a little too bright for me so I added another wash over all of them, this time in a diluted off-white color.


Then I added pattern with designs from stamps I made, applied with more of the off-white color, undiluted this time.


And finally, I screen-printed thermofax images of insects with black acrylic paint randomly to each of the squares. After the paint was dry, I trimmed the squares and topstitched around the edges. I added labels on the back and headed off to the meeting for the grand swap. 28 artists traded 4" squares and a good time was had by all! I found a cool box (meant to store ATCs) that I need to alter to store them all in.


At the meeting it was really interesting to hear how varied all of our approaches to this project were. Some people started out planning to make 29 similar pieces and got bored after 10 so switched to making groups of similar pieces. A few people began intentionally by making definite groups. Several people made all completely different pieces, some within themes, and some not. A couple of people made large backgrounds and cut them down into 4" squares and proceeded with more design. There were a lot of different edge-finishing techniques. Many people chose to work entirely or mostly by hand due to the project's portability. So many different ways to get to the same place!

I find that the assembly-line process works best for me, as you can see from my pictures above. As a printmaker, I'm used to work in editions and this is very much the same thing - all originals, but absolutely an edition or series.

Of course, as soon as we had swapped and discussed and admired, we jumped right into a new challenge - stay tuned!

19 November 2008

Natural Order

A mighty wind last week took down a paper wasp nest that was hanging high up in the tree next our front door. We hadn't even known it was there until the leaves fell.


The nest is vacant and I took some photos this morning before it completely disintegrated. It was about the size of a basketball and strangely, we had never noticed a problem with wasps although it must have housed quite a population when it was active.

The symmetry of the individual cells is amazing. The overall construction is astounding. I tried to salvage some of it to try to incorporate into an art piece but it was too fragile.