Custom Built-in IKEA Billy Bookcases
One of the more fun projects that I've tackled lately has been customizing some IKEA Billy bookcases for a client. I've got the skinny on how it came together, in case you'd like to try something similar. I don't have the glamour-shot "after" photos yet with the perfect styling and the new rug so I'll be sure to update this post when I do.
We started with four of IKEA's ubiquitous Billy bookcases in a space off of their kitchen that was newly designated as a library.
They had just purchased new comfy reading chairs and wanted to use their existing pedestal table. I created a moodboard, or collaged image, of what their space could look like with some changes. We knew we wanted a new rug and lighting above the bookcases, as well as some fun detailed woodwork.
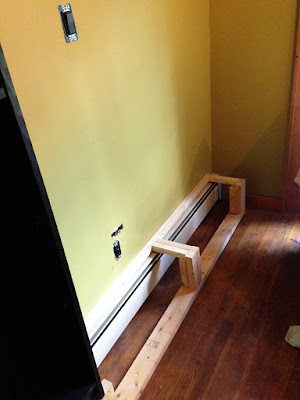
We were on track for a cosy area to read and relax, except for one minor detail. Behind all of those bookcases was a length baseboard heating, causing the bookcases to sit out from the wall about 6" and not allowing us to anchoring the bookcases to the wall to prevent toppling. So I built a base or platform for the bookcases to sit on from 2 x 4s bolted securely into the framing of the house and the floor below. This ensured that there was no weight on the heater itself and that the bookcases would be supported and flush against the wall. I also ran electricity from the existing outlet to a new switch that would be hidden inside a shelf and a new outlet near the ceiling for the lights that would be installed above the bookshelves.
Here are all four bookcases securely fastened to both the newly-constructed base and the wall behind them. They are also screwed to each other in a number of places for stability and to keep all of the front edges even. I used metal L braces on both sides of the bottom of each bookcase to secure them to the 2 x 4s that they're sitting on. I like to build things rock solid with no possibility of failure, so I add fail-safes wherever I can think of them. It might be overkill, but I sleep better.
You can see one light in place as a test, and the new outlet peeking out above the third bookcase. The homeowner had made a hole for a power strip in that same bookcase, but it didn't end up being in the right place for the new switch (which is camouflaged just to the right of it) so that got patched.
Once the bookcases were secured I created a soffit above with a frame of 1x2 pines and added painted planks of wood in different colors, trimmed it out with moulding, and installed the four new lights. The switch inside the bookshelf behind a picture frame controls the lights. I loaded all of the books back on the shelves, staged the table with a vase and flowers, and stood back to admire the work so far.
Because I wanted the heat from the baseboards to be able to reach the room (there is a wood burning stove just out of sight to the left, so it is really warm there, but still), I purchased metal grating to cover the openings below the bookcases without blocking the heat. I cut them to size and spray painted them oil-rubbed bronze. Those got nailed in place. Then I added trim around each of the grates, mitering the corners.
The fronts of the bookcases were also trimmed out in lathing strips over the areas where two bookcases meet vertically so that the units appeared more custom and built in. You could no longer see four individual bookcases, but rather one large unit. I added a 1 x 12" pine board to the left side of the last bookcase, notching around the baseboard, to complete the custom look (not pictured, but I'll take one from that angle the next time I'm there and post it). In retrospect, I should have painted the baseboard heaters (and maybe the floor inside the base) a dark brown color so they wouldn't be noticeable through the grating.


16 comments:
Wow! This looks awesome.
Great work! very good finishing touches!
This looks fabulous! I enjoyed seeing your progress and thinking behind each step. You should have a show on HGTV!
Looks nice but is not to code and a crazy fire hazard. You CANNOT have combustible material (wood) directly above a base board heater. Heat rises and will cause a problem. DO NOT DO THIS IN YOUR HORSE. If it ever catches on fire your homeowners or renters insurance will not cover the damage! Oh and you could die in a house fire. But it does look very nice. I would have removed the base board heater completed if it's not really needed. If it is needed, you could have removed the base board heater, built a box to to add height to the bookshelf, lined the front of the box with metal or other fire proof reflecting material, and then re-installed the baseboard heater so it was in front of the bottom of the book shelf.
I live a house with hot water baseboard heat. The home was built in 1920 and there are built in shelves, a window seat and moulding built over my baseboard heating units. I assume this home is the same. The previous poster may have been thinking of electric baseboard heat which truly cannot come into contact with combustible materials. Hot water heat does not pose the same risks. Relax and build your book shelves.
Thanks for taking the time to post your tips especially in regard to getting over the baseboard heat. I just completed filling in an empty corner of my bedroom using 5 billy book cases with their narrow shelf unit to crate the corner. My heater is also hot water fed and I built the cases up about 5 inches higher than the top of the element. Couldn't be happier with how it turned out! Thanks! Here's a pic of what I came up with: https://drive.google.com/file/d/1EwlrLrlmCAvEbEiyNopvsFzBreRwd7cN/view?usp=sharing
Hi! This is stunning! We’re hoping to do the very same project in our new house. May I ask: have you had much trouble with trapped heat? That’s my guy’s biggest concern.
Hi Brooke,
I'm the poster just above yours in the comments (from 8/24/20). My project has been completed for over a year now and I've had zero problems since, including with regard to heat, which I had been concerned with as well. I've noticed no difference in the amount of heat in our bedroom and there's been no warping in the shelving. I left myself about 8" of room above the baseboard heaters and plenty of vent space.
Baseboard heaters don't get hot enough to catch fire
I saw on another website regarding being able to deflect the heat from the hot water radiators by installing sheetrock on the underside built-in item.
LOL this is the dumbest thing I’ve read in awhile! Hydronic baseboard heaters do not get even close to hot enough to spontaneously combust wood. You clearly have no idea what you’re even talking about!
So here I am, eight years later, learning about how to safely secure my Billy bookcases over the baseboard heaters that I now have. I knew there had to be a way to do it. Thanks for posting, especially the photos!
Nice!! Just what I needed . Thank you
@jane what are the dimensions of the base over the radiator?
Been looking for this idea for a very long time. We own a 1944 home with 4 levels of boiler Heaters ( Hot water Ambiant Heaters). As long as you have at least 2" above top, & air flow in front.your good.
Mind dm me the picture please
Post a Comment