Showing posts with label Tutorials. Show all posts

04 February 2015

Fun with Carrots + a Giveaway!

A few weeks back I reviewed a new book by Julie Booth, Fabric Printing at Home. Today I am back with a fun project from the book and a chance for you to win a copy of Fabric Printing at Home.

On page 53 I found an intriguing idea called Carrots Three Ways. I grabbed a carrot from the fridge, gathered some supplies, and got to work on one of the techniques.


For this project you need a firm carrot (preferably one that's got a section with an even diameter), a knife, and corn cob holders or bamboo skewers. Then you'll need some paint and a dauber or foam brush, and a surface to print on (fabric or paper).


Cut a section of the carrot that's as even in diameter as possible. This will result in a more even print. Eat the ends of the carrot or feed them to your bunny or guinea pig (optional).


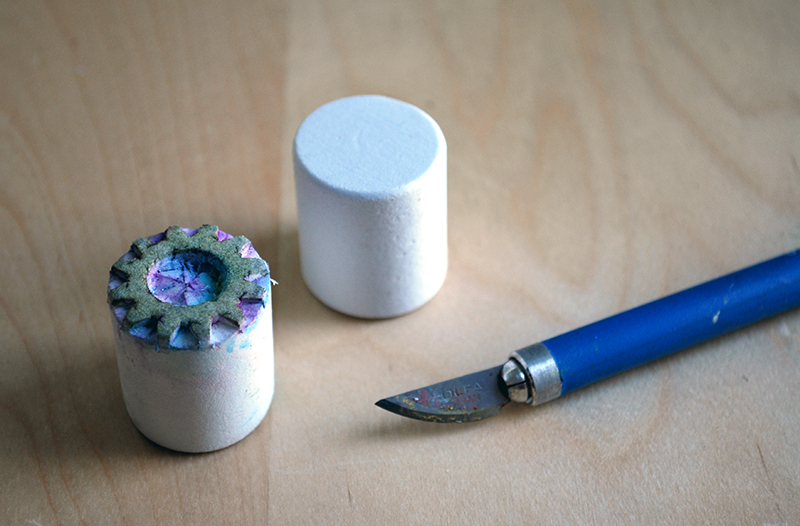
Using the knife, cut designs into the carrot. The designs can be complicated or simple, regular or irregular. Have fun experimenting with this part! The cuts don't need to be very deep but leave a little bit of room between cuts for stability. Julie recommends peeling the carrot first for a smoother surface but I forgot that step in my excitement.


Insert the corn cob holders or pieces of bamboo skewers in the ends of the carrot to act as handles.


Dab on some paint and roll the carrot onto fabric or paper. It helps to have a cushy surface to print on, and it helps to print the first inking onto a scrap to test the amount of paint you've applied and to "prime" the surface of the carrot.


Fun with veggies! This has definite possibilities and I can't wait to try a whole bag of carrots with different designs cut into each one. Before I get started though I think I need to find the vegetable peeler and the corn cob holders…

There are SO many cool ideas just like this in Fabric Printing at Home! If you would like to win your own copy, please leave a comment below by the end of the day on Friday, February 13. Make sure to include your email address so I can contact you for your mailing address.

The blog tour continues tomorrow on Carol Eaton's blog, and the full schedule is below. There are 14 (fourteen!) chances to win a copy of Julie's lovely book, one at each blog stop on the tour. Julie has wonderful tutorials and additional giveaways on her blog each day of the tour, so don't forget to head over there every day.

February 2: Lisa Chin
February 3: Lynn Krawczyk
February 4: Jane Davila
February 5: Carol R. Eaton
February 6: Judy Gula
February 7: Susan Purney Mark
February 8: Teri Lucas
February 9: Jennifer Coyne Qudeen
February 10: Deborah Boschert
February 11: Lynda Heines
February 12: Cheryl Sleboda
February 13: Terri Stegmiller
February 14: Jackie Lams

21 August 2013

Mixed Media Paper Puppets

Here's another new blog feature - Tutorial Tuesdays! I'll be posting new tutorials on Tuesdays (maybe not every Tuesdays, but on some Tuesdays).


This week's tutorial is inspired by palm leaf "Dancing Man" puppets from India. I recreated the puppet using bristol board, paint, stamps, and more.


Materials List:
  • Bristol Board (I used a sheet 9" x 12" and had enough to cut two puppets)
  • Acrylic paint
  • Acrylic glazing medium (optional)
  • Foam brush
  • Commercial stamp or a marshmallow stamp and an X-acto knife
  • Pattern (*below)
  • Smooch pearlescent ink or other pearlescent ink or paint and a tiny paintbrush
  • 10" bamboo skewer
  • Scissors for cutting paper
  • Embroidery floss
  • Chenille or tapestry needle
  • 1/8" hole punch, awl, or large needle
  • Glue

Step 1:
Mix acrylic paint and glazing medium in equal parts. The glazing medium makes the paint more transparent and allows the texture of the paper to show through. 


Using a foam brush, apply the paint and glaze mixture all over the surface of the bristol board. Set aside to dry.


Step 2:
Create a small circular stamp design on a foam marshmallow or use a commercial stamp. If creating a marshmallow stamp, use an X-acto knife to carefully cut a design or pattern into the foam, testing the stamp with a stamp pad on scrap paper to determine when it is complete.

A cut and uncut foam marshmallow


Step 3:
Use a stamp pad in a color a shade lighter or darker than the painted bristol board. Cover the bristol board with stamped images.


Don't re-ink the stamp after every stamping. Instead continue to stamp it 2-3 times for progressively lighter impressions. This adds depth to the overall design.


Step 4:
Cut out the pattern pieces from the PDF provided. Flip the painted and stamped bristol board over and trace the patterns on the reverse side with a pencil. Trace one body, two arms, and two legs, remembering to reverse one arm and one leg.


Step 5:
Using scissors meant for paper, cut out the pattern pieces from the painted and stamped bristol board.


Step 6:
Fold the body in half along the dotted line, as shown.


Step 7:
Using the Smooch pearlescent ink (which has an applicator brush in the cap) or another pearlescent and a small paintbrush, add the face to one side of the body piece, following the diagram on the pattern.


Even slight variations in line when drawing the face results in different facial expressions. Fun!


Step 8:
Paint the bamboo skewer with acrylic paint and set aside to dry.


Step 9:
Punch holes in the body, arm, and leg pieces, following the markings on the pattern, using an 1/8" hole punch, an awl, or a large needle.


Step 10:
Thread a large-eyed needle with three strands of embroidery floss. Tie a large knot in the doubled floss. Starting at the back of the body piece, sew each arm and leg in position with the arm or leg sandwiched inside the folded body piece. End with a large knot on the front of the body piece.


Step 11:
Apply glue to one end of the painted bamboo skewer and slide it up the center of the folded body piece. Set aside to dry.


Step 12:
Play or decorate with the completed Mixed-Media Paper Puppet!

*The pattern for the Mixed Media Paper Puppet:
Click on this image to embiggen and then print out at original size (8 1/2" x 11")


NOTE: Yes, it's Wednesday and not Tuesday. I had two more photos to shoot and ran out of daylight on Tuesday. And Tutorial Wednesday didn't have the same ring to it...


15 January 2013

A new way to learn

I discovered a neat website and app that is like Pinterest, in that it is visually beautiful, but differs in the creation of the content. Snapguide builds tutorials, or guides, with a clean, elegant interface. You can create a guide to anything - a recipe, a craft project, an exercise, anything, or you can search for a guide in any one of an assortment of categories. The guides can have any number of steps and include photos and videos. I think this has the potential to be as big as Pinterest, and without the pesky copyright issues since you can like or share or comment on a guide, but you can't take someone else's content and add it to Snapguide. And if you think it looks nice on the web, it looks and functions fantastically on an iPhone or an iPad!


So far I've added 2 guides, as Flourish!, to Snapguide and I'm aiming to add one every week or so. If you teach quilting or have a creative business Snapguide can be a great way to direct people to your website and enhance your reputation as an "expert". It's also a fun way to share your knowledge.

My two guides (so far!):
http://snapguide.com/guides/transfer-images-using-citrasolv-natural-solvent/
http://snapguide.com/guides/make-matchbook-notepads/

If you have an iPhone or iPad, look for them in the Snapguide App too.

Have you tried Snapguide? What do you think?

06 October 2011

Natural Solvent Transfers

Oh how I love Citrasolv natural cleaner and degreaser! Not only is it an awesome cleaner (you know, if we had time for cleaning!) but it is also a perfect solvent for transferring laser-printed images or photo-copied images to fabric or paper.


Supplies:
CitraSolv orange-based natural cleaner and degreaser
Toner-based laser print or photocopy (either black and white or color) printed onto plain copy paper, in reverse
Foam brush
Scissors
An old spoon or a burnisher
Paper or Prewashed fabric (the smoother the surface, the sharper the print)
Scissors

1. Cut the printed sheet apart into separate images, if you’ve printed more than one on the page. Make sure that the image is printed in reverse or mirrored as the transfer process reverses the printed image, This is especially important for text!

2. Place the image face down on the desired fabric or paper and hold firmly.

3. Moisten the foam brush with a small amount of CitraSolv. Be judicious, a little bit goes a long way. 


4. Rub the moistened foam brush onto the back of the printed image, being careful not to shift or wiggle the paper which will result in a blurry transfer.


5. Once the paper is saturated you will see the image start to show through the back of the paper. At this point, vigorously rub the back of the paper with an old spoon or a burnisher.

Tip: It can be helpful to work on a slightly padded surface. I often place a scrap piece of batting or an old mouse pad under everything.


6. Lift up one corner of your printed page to peek and see if the image is transfering. If it isn’t, let go of the corner and resume burnishing. If it has transfered, remove the printed paper.

Tip: Printed images can only be transfered once, so discard the saturated paper after you’ve completed the transfer.


7. If you allow the transferred image to sit out the CitraSolv will evaporate in a few hours. If you are in a hurry, cover the transfered image with parchment paper and lightly press with a warm iron. Make sure your work area is adequately ventilated as the odor will be concentrated and more intense with the heat of the iron.

 Finished piece with CitraSolv image transfer.


There are many different ways to transfer images and photos to fabrics and other surfaces. Using a solvent and a laser-printed copy is one of them. I prefer a natural, orange-oil-based solvent like Citra Solv for its non-toxic properties and its great smell. It’s essential that the image is printed on a toner-based laser printer or photocopy machine as an inkjet printer or solid ink laser printer won’t work.