Showing posts with label before-and-after. Show all posts

19 March 2012

Studio Tweak - Behind the Door

The space for my studio in our new house is much smaller than it was in our previous house and every square millimeter needs to pull its weight. I like to use visual systems to keep myself organized and I needed a way to keep all of the paperwork associated with teaching and vending gigs, and their attendant travel arrangements, organized and attractively at hand. I also needed an out-of-sight place to store some of my packing and shipping supplies, as well as some gift-wrapping accessories. I started by analyzing available areas and finally settled on this area behind the door that you use to enter the studio. This door is kept open nearly all of the time, so the unused space behind it would be ideal for my make-over.

This is the before:
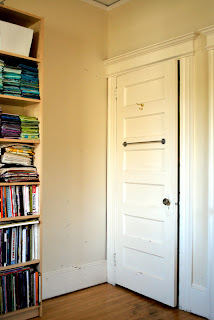

This space is definitely not living up to its potential! There's 3 feet of wall space and the entire back of the door just crying out for purpose. The wall is looking a little beat up and the trim could use some touch-up paint, but those are easy fixes. Since the walls are painted with flat-finish paint, a Mr Clean Magic Eraser takes care of most of the scuff marks. Remove the gold hook, patch a few holes and add a bit of semi-gloss paint on the trim and door, and we're good to go. I had hung up the one rod soon after we moved in but I kept thinking that more rods would be more useful. A trip to Ikea took care of that and I picked up 2 more rods, a package of hooks, and a few baskets to hang off of them, all from the Bygel series.

Here's the smooth-functioning after:


I drew inspiration for the clipboards from a few sources, most notably my co-author Elin's similar clipboard system as featured in Quilting Arts Studios magazine a few years back, and for the hanging rods and bins on the back of the door from Adventures in Renovating a Brooklyn Limestone's make-over.


The clipboards as-is were a little too boring, so I jazzed them up with a bit of hand-printed paper from an art supply store. First, I made a template of the shape I'd need to cover the surface of the clipboard by using a piece of cardstock and measuring, drawing and cutting until it was a perfect fit.


Then I traced around the template on 2 different printed papers and cut 3 of each for a total of 6 pieces. I was thinking this would be fun with 6 different papers too, but didn't want to stop long enough to run to the art supply store again.


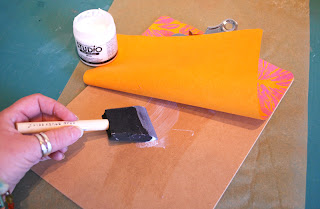
Next, I used gel medium (Claudine Hellmuth's Studio MultiMedium is one of my very favorites) to adhere the paper to the face of the clipboard. After applying a thin and even coat, I pressed the paper in place, flipped the clipboard over and weighted it down so the paper would dry flat, leaving the clip hanging over the edge of the work table.


I wanted to have a way to label each clipboard and hide the brand stamped into the metal at the same time.


First I tried printing out labels and affixing them to the clipboard with magnetic tape. That was okay, but didn't look finished enough and I think the labels could have been knocked off fairly easily.


Another trip to Staples office supply store (for another 2 clipboards - I only started with 4 for some reason), found me wandering the new Martha Stewart supply aisle. Yum. There I found adhesive metal bookplates, coincidentally sold in packs of 6. Obviously meant to be!


They fit perfectly over the logo and in the space on the front of the clip.


Here's a look at the oh-so-pretty after again:


There's something about Spring, finishing up some projects for deadlines, and having a few weeks at home between trips that brings out the organizing bug in me. What have you organized lately? How do you tame the "paper beast" in your studio?

06 January 2012

A quirky colorful sunburst mirror

UPDATE: I was invited to share this project in an upcoming issue of Modern Patchwork from Interweave so I removed the how-to part of this post. Look for complete directions and photos in this special magazine this spring!

My over-the-dresser project involved a plain round mirror from Ikea, a "jelly roll" of pretty fabric strips, a tester jar of paint and two bundles of wooden shims. I admire classic sunburst mirrors, but the "classic" part is just not us so I decided to put my own contemporary, quirky spin on it.


How cool is that? And no sewing involved!!


Hanging it up the next morning was pretty exciting! It's colorful and quirky and unexpected. And it makes me happy every time I walk by it. :)


02 January 2012

Dresser revealed

I am so pleased with the way the dresser turned out. It makes me smile every time I go in or out of the vestibule and I find myself peeking in there multiple times during the day.


It's a little hard to photograph because the outside glass doors let in a lot of light and it causes reflections on the sheen of the paint, which is a satin finish. The knobs look like jewels and the scale is so much better than the original dark wooden knobs.


As a reminder, this is where I started, with the tired, dark nondescript dresser:


I added modern, clear, slightly larger wheels, replacing the small, dark wooden wheels that didn't work very well and kept trying to scratch the floor.


Next up is completing the project that will hang over the dresser. You can see the mounting clips already in place. The mirror is another example of practicing patience, this time waiting for glue to dry. Hopefully tomorrow it will be ready to show off. I'm really excited, it is turning out really well!

28 December 2011

Watching paint dry...

The paint is dry (well dry-ish, it takes 3-5 days before you can place anything on top of it and a full 30 days to fully cure for maximum hardness and durability), the knobs are installed and the dresser is back in the hallway. I'm going to wait another few days before I style it with a pretty dish and some accessories and then I'll take official photos of it in place. This photo will have to serve as a teaser until then. Isn't that color delicious? I have to say, I really enjoyed using the paint - Benjamin Moore's Advance - the finished product looks very professional and smooth, and the soap and water clean-up was a dream. And look at how pretty those mercury glass knobs are.


Next up is a project to fill the blank space above the dresser. We are very fortunate to live in a house with 9.5 foot ceilings so there's quite a bit of blank wall in that little hallway. My project involves a bundle of strips,


but no sewing! I will tell you that it will be my twist on a popular interior design trend. I've been working on proportions and prototypes and will be diving in with the power tools tonight.

I also finished another series of fiber postcards, this one in the theme of Houses. Another task I can cross off my list. Yippee! I'm trying to move in to the new year with as much of this year's tasks crossed off as I can.


26 December 2011

Progress - on several fronts

I have made a little progress on my painted dresser project since the last time I posted. A few things, and the holidays, derailed my timeline, but I'm moving forward again.

Each drawer in the dresser has a lovely brass keyhole and I wanted to preserve those when I painted the drawer fronts.


I covered the keyhole with painter's tape, pressing along the contours.


Then I carefully cut around the outside edge with a sharp blade.


Lifted up the excess and voila! Ready to go.


Repeat 3 more times and break out the paintbrush.


The paint, Advantage by Benjamin Moore, went on like a dream. I was little nervous when I first opened the can because the color is SO much lighter than I remembered it, but it's drying to a deeper, richer shade. Phew! The sheen is perfect too. The instructions recommend waiting at least 16 hours between coats and I'm fighting my impatience but winning so far. You can tell that I'm going to have to address the insides of the drawers. They're kind of icky. I've been browsing online for pretty drawer liner paper today and found an excellent one at The Container Store (cucumber scented even!) but they're out of stock online and the nearest store is 45 minutes away. Decisions, decisions...


On the art front, I finished some fruit-themed postcards and mailed them off. In my head they were supposed to be sliced tangerines, but after I made them I sliced a tangerine and the actuality didn't match the imagination. Now they are mystery fruit. Or tomatoes, as Carlos helpfully pointed out. I am still really pleased with the finished cards.


I'll have an update on the finished dresser in a day or so, depending on how my patience holds out. Now I'm planning the project that will hang over the dresser. Hopefully the result, unlike the tangerines, it will more closely match what's in my head, hahaha.

06 December 2011

The Artistic Life

I think that artists infuse every aspect of their lives with art, every choice affecting design and color is informed by an artist's eye and aesthetic - from furniture to clothing to the dishes on the dinner table. I'm endlessly fascinated with design, in all its many permutations. I follow lots of design blogs, am addicted to HGTV and am an unrepentant DIY-er. How about you?

I decided to start posting some of my home dec projects and before-and-afters here from time to time and I'd like to begin with this one. So far, I'm only on the "before" (yet eagerly anticipating the "after"). We have a small vestibule at the front of our house between the double glass doors that open onto the front porch and the interior door that opens into the front hall. I've been on the lookout for a small table or dresser for this space since we moved in late last year. Nearly every Sunday all spring, summer and fall, Sam and I scoured the Elephant's Trunk Flea Market in New Milford CT looking for such a creature. The criteria was that it had to have good lines, be solid, sturdy and in reasonably good shape, and most importantly, be cheap (er, affordable). Over the months we saw a few that were too big, too small or perfect but way too expensive. In September we finally hit the jackpot. And look at how well it fits the space! There's about 2" clearance on each side.


It's a solid oak 1920s dresser with a couple of minor defects. The top is ever-so-slightly warped in one spot, which I think is fixable with wood glue and a strong clamp, and one of the drawers doesn't close perfectly, which you can only notice from a certain angle so I decided it doesn't bother me, since the angle involves some contortions.
 
My plan is to paint it a fun color. Gasp! I know that is upsetting to some people, but that's what I've wanted to do with a piece of furniture for eons and this isn't an heirloom, so I'm going for it. I love the juxtaposition between a fairly classic looking piece of furniture and unexpected color and modern touches.
 
I ordered some mercury glass melon knobs from Anthropologie to replace the too-small wooden knobs currently on the dresser.


I had a quart of Benjamin Moore's Advance paint mixed in a lovely tealy blue shade called Seaside (which I think will go really well with the red tile floor). I've heard so many good things about this paint - in particular that it has leveling properties that makes it ideal for painting furniture and cabinets.


Today I took advantage of the last warm day for a while (60 degrees in December, in New England - crazy!) and dragged the dresser out onto the porch and sanded that puppy down. Now it's ready for color. Or maybe I need to prime it first? I also need to look for some gorgeous paper to line the drawers. Any suggestions of places to search?

Anyway, stay tuned for part two!