Showing posts with label studio. Show all posts

01 August 2016

Moodboard Monday: Sewing Studio Storage

Organizing a sewing studio can be a tricky, and seemingly never ending, task. Today I have some unusual and unexpected ideas to help corral your bits and bobs, all while looking good!

For me personally, I want my studio space to be beautiful as well as functional. I want an inspirational space that isn't too visually distracting. A studio where everything has a place and I won't waste time hunting for supplies and tools. And especially a place where I can focus on the work and not on how much I hate how disharmonious something looks or how hard something is to find.


I spent almost two solid months last year going through every last thing in my studio, category by category. It was the first time in over 15 years and it was time well spent. I gifted or donated things I no longer needed. I threw away art that I wasn't happy with, and I evaluated everything. And everything that stayed now has a home, I can lay my hands on anything at a moment's notice, and I make a concerted effort to put things back when I've finished using them. All of this is saving me time, aggravation, and money. It used to be easier to just buy another ruler/spool of thread/thread snips if I had searched all day and wasn't able to locate it. Need a blue seed bead or a gold ear wire, yeah, I've got that right here!


Because my studio is outside of my home in an old factory the public is frequently invited in, through workshops that I offer, a mentorship group that I lead, or during open studios that all of the artists in the building participate in. Plus my studio is a place where I spend a lot of time and I prefer spending it in a space that is pleasing to look at. My space is not only designed for working but can also be a classroom and a showroom (and a place to hang out and talk about art and eat ice cream, as one does...)

I've rounded up some containers and organizing items that you might find helpful when organizing your own studio. Links are provided below.


1. Bisley 5 drawer cabinet - This metal cabinet is the perfect size for a tabletop and the flat drawers hold a ton of little items like beads, threads, scissors, and more. There are even inserts for the drawers  available with different configurations of compartments to sort all of the little stuff out. Plus the cabinet comes in a range of luscious colors!

2. Rotating hardware bin - This metal bin spins around and can keep spools of thread, flosses, buttons, paint bottles, and glues right at your fingertips. 

3. CD or DVD cabinet - if you collect fat quarters or other small yardage amounts of fabric, then a CD cabinet can be your best friend. A cabinet like this uses less than a square foot of floor space, but holds a ton of fabric (neatly folded and easy to see, select, and use).

4. Picture ledge - Don't neglect the wall space when organizing supplies! A picture ledge or two (or four!) can easily store paint bottles, spools of ribbon, large cones of thread, and much more without using any floor space.

5. Glass curio boxes - lidded boxes can be beautiful to store colorful and pretty supplies like thread, washi tape, ribbons, even scraps of fabric. And the lids keep the dust out.

6. Watchmaker's cases - these little tin cases are ideal for beads and findings. The clear tops make it easy to find exactly what you're looking for, and they're so shallow that it's easy to scoop beads right out of them as you're working. They're available in a lot of diameters. I have four drawers full of beads in these cases in my studio and I LOVE them!

7. Sugar dispenser - this one is a little weird. I know you're wondering why and how, but stay with me. The humble yet classic sugar dispenser is perfect for twine, string, yarn, and thin ribbons. Simply pop a cone of string into the dispenser and feed one end through the pop-up top. Pull out what you need, trim it off, and leave the end sticking out and ready for next time. They're inexpensive so this is an extremely cost effective organizing tool, especially if you have a lot of string, yarn, or twine and use it frequently.

8. Magazine racks - using the wall space again, you can keep reference books, patterns, and magazines at hand with a magazine rack or two. Bonus points if there's a label holder on the front of the rack so you know what's where!

9. Kitchen rail systems - another storage-on-the-wall device, this time using a kitchen rail system. There are a wide variety of systems available with different components that you can add to them to create a system that's perfect for you. Use the hooks to hang rulers and scissors, cups can contain pencils and markers, shelves can hold pin cushions or adhesives.

A terrific and free space planning tool available for desktop computers and tablets (and even smartphones) is Roomle. You measure your room and then draw the walls of your space, add windows and doors, and then add furniture. You can resize the furniture to duplicate what you have (or what you're planning to acquire), then drag it around, rotate it, and figure out how best to lay out your studio. You can duplicate and save multiple versions of the same room to help decide which might work best for you. It certainly saves your back from actually lugging all of the furniture around! You can even switch to 3D mode and take a virtual walk around your room to see how it feels.

If you're looking for even more ideas for pretty studios and storage solutions, please visit my Studio Inspiration Pinterest board for more thoughts (and lovely pictures). What's your favorite unusual storage gadget? Scissors in a knife block? Bobbins in an ice cube tray? I want to hear all about it. Together we can organize all the things so we have more time to sew and paint!!

19 March 2012

Studio Tweak - Behind the Door

The space for my studio in our new house is much smaller than it was in our previous house and every square millimeter needs to pull its weight. I like to use visual systems to keep myself organized and I needed a way to keep all of the paperwork associated with teaching and vending gigs, and their attendant travel arrangements, organized and attractively at hand. I also needed an out-of-sight place to store some of my packing and shipping supplies, as well as some gift-wrapping accessories. I started by analyzing available areas and finally settled on this area behind the door that you use to enter the studio. This door is kept open nearly all of the time, so the unused space behind it would be ideal for my make-over.

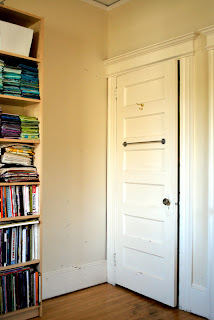
This is the before:


This space is definitely not living up to its potential! There's 3 feet of wall space and the entire back of the door just crying out for purpose. The wall is looking a little beat up and the trim could use some touch-up paint, but those are easy fixes. Since the walls are painted with flat-finish paint, a Mr Clean Magic Eraser takes care of most of the scuff marks. Remove the gold hook, patch a few holes and add a bit of semi-gloss paint on the trim and door, and we're good to go. I had hung up the one rod soon after we moved in but I kept thinking that more rods would be more useful. A trip to Ikea took care of that and I picked up 2 more rods, a package of hooks, and a few baskets to hang off of them, all from the Bygel series.

Here's the smooth-functioning after:


I drew inspiration for the clipboards from a few sources, most notably my co-author Elin's similar clipboard system as featured in Quilting Arts Studios magazine a few years back, and for the hanging rods and bins on the back of the door from Adventures in Renovating a Brooklyn Limestone's make-over.


The clipboards as-is were a little too boring, so I jazzed them up with a bit of hand-printed paper from an art supply store. First, I made a template of the shape I'd need to cover the surface of the clipboard by using a piece of cardstock and measuring, drawing and cutting until it was a perfect fit.


Then I traced around the template on 2 different printed papers and cut 3 of each for a total of 6 pieces. I was thinking this would be fun with 6 different papers too, but didn't want to stop long enough to run to the art supply store again.


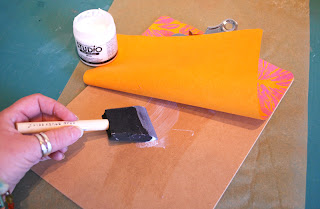
Next, I used gel medium (Claudine Hellmuth's Studio MultiMedium is one of my very favorites) to adhere the paper to the face of the clipboard. After applying a thin and even coat, I pressed the paper in place, flipped the clipboard over and weighted it down so the paper would dry flat, leaving the clip hanging over the edge of the work table.


I wanted to have a way to label each clipboard and hide the brand stamped into the metal at the same time.


First I tried printing out labels and affixing them to the clipboard with magnetic tape. That was okay, but didn't look finished enough and I think the labels could have been knocked off fairly easily.


Another trip to Staples office supply store (for another 2 clipboards - I only started with 4 for some reason), found me wandering the new Martha Stewart supply aisle. Yum. There I found adhesive metal bookplates, coincidentally sold in packs of 6. Obviously meant to be!


They fit perfectly over the logo and in the space on the front of the clip.


Here's a look at the oh-so-pretty after again:


There's something about Spring, finishing up some projects for deadlines, and having a few weeks at home between trips that brings out the organizing bug in me. What have you organized lately? How do you tame the "paper beast" in your studio?

13 June 2009

Art in the Studio


I can't post anything that I've made lately (top secret and all that jazz), so I thought I'd show you some of the beautiful pieces I've been fortunate enough to acquire lately. I love how wonderful they look matted and framed, I love how well they work together, and I love how simpatico they all are with the string of birds Elin gave me years ago. A bright happy corner in my studio.


The piece on the top is an ACEO by Lisa Call - you have to see one of these in person, the detail and workmanship are astonishing. The middle piece is by the delightful and lovely Mati McDonough, I adore its positive, fresh, fun and bubbly vibe. And the bottom piece is by the incomparable Liz Berg. I've been hankering after one of hers for eons and was fortunate enough to get this during the recent Collage Mania.

Back to work, and as soon as I can, I'll show you what I've been up to!

30 March 2009

Simple Arts Podcast


When I was teaching in Asilomar at the Empty Spools seminar a couple of weeks ago, I had the great pleasure of meeting Annie Smith, podcaster extraordinaire. She interviewed me one evening and we really hit it off. You can head to her website to listen to the podcast and hear us chatting about art and quilting and life and everything. Please leave a comment for me here - I'll be giving away a copy of my new book, Art Quilts at Play, on Wednesday, April 1st (no fooling!)


So you can follow along, in the podcast I talk about the books I've written with Elin Waterston, the shop that my mom and I opened in 1990 (that will continue as an internet store) and my husband's artwork.

UPDATE: The winner of the free book is "sewjoe"! Please contact me with your mailing address and I'll get an autographed copy of Art Quilts at Play right out to you. Thank you everyone for your very kind comments! And thank you Annie for the opportunity to talk to your listeners!

18 February 2009

Almost...

The new office area in the barn studio is nearly complete. Sometimes I think I should have been an interior designer, the decorating part of any project really floats my boat (bad metaphor, I get seasick really easily, but you know what I mean). Or, putting my reno and carpentry skills together with the decorating, a contestant on one of those reality shows where you get two days, $100, half a sheet of plywood, six old planks of knotty pine, two rubber bands and one copy of the Sunday New York Times to make over a room. I would totally rock that.


This project did involve trips to Ikea, Home Depot, Lowe's and an office supply store, and didn't involve any rubber bands, but it still looks hot. The shelves on the other side of the room are getting containers and labels. I need another trip to Ikea to finish it up.


And yeah, it's snowing again. Even with the snow, the view is better with the window.

More art, another collage made in December:


pescados musicales

15 February 2009

Ch-ch-ch-changes

Lots of stuff going on, lots of changes happening and lots of time being eaten by said stuff and changes, which leaves little time for art. So, I'm going to distract you from the fact that I haven't posted a new Loteria collage in a while with some art I haven't shown yet.


las peras verdes

This is a mixed-media collage mounted on bristol board, using more of the mini-pear prints from last summer.

And this is a quick peek at one of the distractions in my life right now - another reno project, this time in Carlos' studio.

We decided that the shed attached to his studio would benefit from the addition of a window, among other things. Of course, there's always more to a project than that.


First I needed to clean everything out of the room and paint. I like to visualize things in advance (and I'm impatient), hence the blue tape to see where the window will go.


A quick trip to Ikea with a very focused list netted us some extra-tall shelves to create an impressive amount of storage along one wall of the room. I love Ikea.


Today we put in the new window and tomorrow, after the foamy, squirty insulation is dry and shaved down and the moulding is added, I'll take photos from inside. This is a picture from outside and in looking at it closely, I'd better add "paint the barn" to my To Do list for the Spring. Ignore the air conditioner lounging on the shed roof. It's a long story involving two ladders, a long rope, colorful words in several languages, rodent offspring and a slight miscommunication...


Have you noticed that when life-changing events are taking place that you have difficulty producing art? I certainly do. It isn't even a matter of having the time or desire, but rather the mental, emotional and creative energy necessary. So, a fallow and frustrating time.

26 July 2008

Art Quilting dvd


The dvd that Elin Waterston and I taped back in April has just been released. Jane & Elin Teach You Art Quilting Basics is available in quilt shops worldwide or you can order a copy directly from me.

The dvd has lessons and demos based on material from our book, Art Quilt Workbook, and also includes a tour of my studio.

06 April 2008

Rolling...

I haven't posted much art lately and with good reason - Elin and I have been preparing to shoot a dvd for C&T Publishing based on material from our book, Art Quilt Workbook. We've been working on samples and step-outs, and gathering materials and supplies, and writing the script for ages. The shoot was this weekend at my house.

Got Moxey?

We worked with our awesome director, Jane Moxey, on Thursday and Friday rehearsing and getting ready, and then first thing Saturday morning the crew showed up at my house. We asked a good friend, Karen, to be our trusty personal assistant and we couldn't have chosen better. It was a pretty intense 16+ hours. The crew, Sean, Pat, Steve and Chris, was amazing. It was cool to watch them set up all of the equipment in my studio.

Chris connecting cords


Chris, Pat and Moxey shooting my stash with Karen looking on


Karen helping Elin set up a scene

We couldn't have done it without Karen. She kept us organized and centered. She even earned a cool nickname from the crew, Slate, because one of her many jobs was slating each scene with its number and take. We're so grateful to her!

Steve, Moxey, Sean and Chris check out a shot


Karen and Pat help me lay out a demo


Elin all super serious right before a take


And not so serious. Smashing!


Nearly done... It was a long day when we finished at almost 2 AM.


The dvd, Jane Dávila & Elin Waterston Teach You Art Quilting Basics, part of C&T's At Home With The Experts series, will be out this summer.

26 March 2008

Cloth Paper Scissors - Studios


The latest special interest issue, Studios, from Cloth Paper Scissors is shipping now. My studio is featured in a six-page spread and the layout looks fantastic (in fact I wish the room was as clean right now as it was when I took the pictures!) The issue is wonderful and has pages and pages of inspiration and organizational ideas.


It's energized me all over again to get going on a few more pieces of furniture. I've got at least one more thing to build once the deadlines that have taken over my life abate somewhat. And the floors need re-finishing. And the walls need painting.

27 September 2007

Recycled Table - finished!

I finally got around to taking pictures of the giant rolling "island" I built for my studio that started with the top of my parents' kitchen table. It has shelves on three sides for storage. The short end has shelves that hold metal flower pots from IKEA. In the pots are all sorts of art supplies that I like to keep at hand. Things like colored pencils, palette knives, hand-carved stamps, stamp pads, acrylic paints, tubes of watercolors, etc.

One long side has storage cubbies for stretched canvases (for mixed media work), printing supplies like bench hooks, rollers, brayers and acrylic plates, and a shipping center. The big space in the middle allows me to pull up a drafting chair and work at this table. Which is always a bonus when flat surfaces are at a premium.

The other long side has canvas bins for current projects, plastic Artbins for more supplies and class samples, and great storage for my Dremel, block-printing press and Gocco printer (sadly still unopened!) I love that this table is on wheels and I can move it anywhere in the room, or even out of the room if need be. Have work table, will travel!

19 September 2007

Finished with the Media Cart

The media cart is done. You saw one side of it here. Now, finally - here's the other side. I had a piece of 1/4" thick acrylic custom cut and had the holes drilled and countersunk for wood screws. I pre-drilled holes in the wood and then hand-screwed the acrylic to the cart. I still managed to crack very slightly the acrylic when I overtightened one screw, but otherwise I'm pleased with the way it came out. Note the oh-so-subtle marketing ploy of my book in one of the pockets (big grin). I'll be using these pockets to hold new books that I'm currently reading or using as reference for works in progress. There's a neat technique with acrylic glazes in the new Cloth Paper Scissors, by the way.

In the background is another piece of furniture that I built, it's one from a few years ago. I made it to hold some white metal bins from Pottery Barn. I do love the design principle of repetition. There are small bins and large bins and they hold things like yarn and trims, art glitter, pearl ex powders, stamp making supplies, adhesives and mediums, angelina, foil and other surface design materials.

06 September 2007

Lost and Found

Okay, this is a pretty cool story. In 1965 my husband Carlos was one of three artists to represent Peru at the Paris Biennale at the Musée d'Art Moderne. His two paintings were shipped back to Peru at the conclusion of the show and due to military unrest in the country at the time and his immigration to New York they were never collected at the port when they arrived.

The other day a man in Texas emailed him to ask about a painting he had inherited from his father. It was one of the lost paintings from the Biennale. How exciting to have a photo of something I'd never seen and he'd never thought to see again.


Even though it's an abstract I see both a mask and a bird in it. We're so delighted this man tracked him down and that we have a record of at least one of the paintings.

I did work on the big table in my studio over the weekend and should have new pictures up in a couple of days. I had to wait for the table saw a few times (there was a line! since Carlos was working on frames and stretchers) which slowed me down, so I kept busy while I waited. I really don't sit still well. I baked four loaves of banana bread and two batches of chocolate chip cookies. I'm surprised that the earth didn't wobble slightly on it's axis - I *never* bake or cook. Wait, I'm sensing an evil plot here... The joke is that the only reason we have an oven is because otherwise there'd be a hole in the cabinet.


Here's a quick organizational idea: I bought some of those tins with magnetic bottoms and mounted two metal strips to the wall in my studio. I think the tins are meant for spices or some such, but mine have unmounted rubber stamps, some cool colorful stones from Peru, some cool buddha stones from Thailand and other little doodads in them.

30 August 2007

Recycle, reuse, repurpose

This is a picture of the table that was in my parents' kitchen for most of my childhood. It's a solid, sturdy table with a maple butcher-block top and it's lived in my studio for the last five years or so. I'm recycling the top into the top of my new storage/work station. Imagine a "kitchen island" on wheels with storage on three sides and you'll have a fair idea of where I'm going. I removed the legs and flipped the top face down on the floor of my studio. I only want to drill holes into the underside, so it's easier to construct the base completely upside down.

This is one side with its dividers in place. There will be shelves but they aren't cut yet.

This is the opposite long side, also waiting for shelves.

And this is one short side with its shelves in place. Once the wheels are attached I'll need to find a football team to help me turn it right side up. This magilla is heavy!! My husband was mumbling something about adding a support beam in the basement under my studio, which might not be a bad idea. I'd hate to find out the hard way that the floor couldn't support the weight of this fully loaded.

21 August 2007

Shut the door!


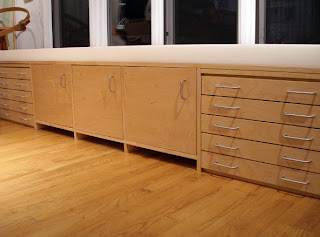
Who else remembers Señor Wences? His "shut the door" routine was one of my favorites. Anyway... the doors are now on the window seat. The two cabinets in my studio that form the ends of my worktable each have double doors (not shown). I must have sweet-talked my husband into adding them when I built those cabinets, because I haven't done doors before. That was not as easy as it looks (wait, did it look easy??) They appear to be a little crooked in the picture, but they're much straighter in person. The foam for the cushion is sitting on top, awaiting it's cover. And even though you can't see her, the dog was sitting on my lap while I took pictures because she was convinced that I wanted to take a picture of her and wouldn't get out of the way otherwise. Then when I was done and wanted to take her picture, she ran away. Contrary puppy.

Here's a view with the media cart in front of the window seat, acting like an artsy coffee table (but I don't drink coffee, so buckets of art supplies are much better.) I plan to start one more big (really big) piece of furniture tomorrow and then I might be good for a while. Although I sketched a taboret-like creature to hold buttons and little doodads - tall and skinny with lots of shallow drawers with dividers. Hmm...