23 September 2013

B2B Monday - Take a Scary Step

Happy Monday! This week's tip involves scaring yourself. I'm not talking about ghosts and goblins here, but getting out of your comfort zone and taking a step in your career that you've been putting off because it makes you nervous or scares you a bit.


I always tell my students that real growth, both personally and as an artist, occurs when you are trying or doing something outside of that zone where you feel comfortable, the zone where you know the outcomes before you start, and where boundaries aren't pushed very hard. By definition you will feel uncomfortable outside that zone. That's the stretching and growing you need to do as an artist in order to progress, to expand your skills, and to make the zone that much bigger.

So this week, take a scary step forward on your career - submit an article idea to a magazine if you never have before, enter a big show, attend a meeting of a new-to-you group of artists, approach a gallery about showing your work - do something that makes you feel a little nervous and a little uncomfortable (or even a whole lot uncomfortable), and take comfort in the fact that you're growing and stretching and moving your career forward!

Please report back after you've taken your scary step and let me know how it goes. Onward, peeps!


16 September 2013

B2B Mondays - Professional presence

Today's business tip for artists has to do with your professional presence. Your business cards (and postcards if you use them) are an excellent marketing and networking tool that you should carry with you at all times.


You have no idea where the next opportunity will come from and being prepared with a snazzy business card with all of your contact information printed on it means that you won't miss the opportunity and you won't be scrambling for a napkin on which to jot down your details.

Keep in mind that your business cards should be in alignment with your brand so tie them in to your blog or website design, colors, and fonts. Use the space on the card to highlight a photo of your work, even a thumbnail is great!


If you're low on business cards, or if you haven't printed any yet, take time this week to design and order some. Think about adding links or icons for social media so your contacts can connect with you on the platform of their choice.

My favorite online resource for business cards is Moo. The quality of their cards is outstanding and their customer service is amazing. I have ordered cards from them for years and have been more than impressed every time. If you'd like a 10% discount on your first order, click here. Disclaimer: I receive a credit to my account when you click that link, but I love Moo so much, that I'm just as happy if you visit their website directly and bypass the affiliate link (there's no discount if you do though, lol).

There are, of course, many other places to have business cards printed, both online and locally, so I encourage you to explore all of your options. Think carefully about using a "free" printing service if the catch is that they print their logo or web address on your card. This option appears much less professional because it gives the receiver of your card the impression that you aren't serious enough about your business to invest money in it.

Another great option is to design and print your own business cards. Most office supply stores carry business card blanks - sheets that you can print in your own inkjet or laser printer that snap apart easily and look clean and professional. I did this for years before discovering Moo (and still sometimes resort to this option when I've run out of cards before a new order arrives). One drawback I've found is that the paper isn't quite as thick and luxe as the paper used by a commercial printer.

If you design and print a new business card, please add a link in the comment section here so we can all see it!

09 September 2013

B2B Mondays - Connect your Social Media Accounts

Good Monday morning! Are you ready to start off the week with a tip to help you network and keep the door to opportunity wide open?


Now's the time to double check all of your social media outlets to make sure that you've taken the opportunity to connect them together and lead visitors back to your website so they can contact you.

For example, if you are on Facebook, you can edit your profile to include the web addresses of your page on every other social media site you belong to (and most importantly, to your website and blog addresses). Add the urls for your twitter account, your Pinterest boards, your Instagram feed, and more. On Pinterest, edit your profile to include your website address. Check your Instagram account to be certain that your profile lists your web or blog address. Add the addresses of a few ways to connect with you to your email signature so you won't need to type it each time.

And of absolute, primary importance, make sure that your website and blog both have contact information so visitors can reach you! Either a contact form or a link to an email address is perfect. I can't tell you how many times I've had a cool opportunity to offer an artist, visited a beautiful blog or website, and have poked around for way too many minutes trying in vain to find SOME way to contact the artist. I'm more persistent than others might be but I've given up many times without having finding contact info. If there's no way to get in touch with you, who knows what wonderful things you're missing out on? So go now to your blog or website and look at it with "outsider eyes" and see if there is an easy and obvious way to contact you. Check your social media sites to be certain that they either link to each other or link back to your blog or website or both.

26 August 2013

B2B Monday - Update your bio!

Welcome back to Back to Business Mondays!


Today's tip is about keeping your professional biography up to date. If you haven't done it recently, take some time this week to add any new publications, exhibitions, and other relevant news to it. Add a reminder to your calendar on December 1 to update it again. It's an excellent idea to update a biography every 3 months (if you're really active, it could be more often). This way you aren't scrambling if you need a biography for something plus updating it on a regular basis keeps the news fresher in your mind so you aren't struggling to recall details from 2 years ago, and it will take moments to do rather than a potentially much longer time (ask me how I know!)

When was the last time you updated your bio?

21 August 2013

Mixed Media Paper Puppets

Here's another new blog feature - Tutorial Tuesdays! I'll be posting new tutorials on Tuesdays (maybe not every Tuesdays, but on some Tuesdays).


This week's tutorial is inspired by palm leaf "Dancing Man" puppets from India. I recreated the puppet using bristol board, paint, stamps, and more.


Materials List:
  • Bristol Board (I used a sheet 9" x 12" and had enough to cut two puppets)
  • Acrylic paint
  • Acrylic glazing medium (optional)
  • Foam brush
  • Commercial stamp or a marshmallow stamp and an X-acto knife
  • Pattern (*below)
  • Smooch pearlescent ink or other pearlescent ink or paint and a tiny paintbrush
  • 10" bamboo skewer
  • Scissors for cutting paper
  • Embroidery floss
  • Chenille or tapestry needle
  • 1/8" hole punch, awl, or large needle
  • Glue

Step 1:
Mix acrylic paint and glazing medium in equal parts. The glazing medium makes the paint more transparent and allows the texture of the paper to show through. 


Using a foam brush, apply the paint and glaze mixture all over the surface of the bristol board. Set aside to dry.


Step 2:
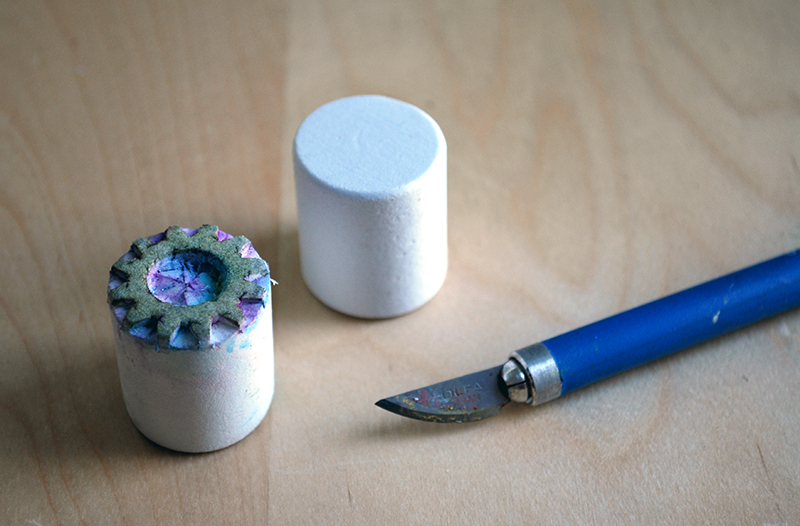
Create a small circular stamp design on a foam marshmallow or use a commercial stamp. If creating a marshmallow stamp, use an X-acto knife to carefully cut a design or pattern into the foam, testing the stamp with a stamp pad on scrap paper to determine when it is complete.

A cut and uncut foam marshmallow


Step 3:
Use a stamp pad in a color a shade lighter or darker than the painted bristol board. Cover the bristol board with stamped images.


Don't re-ink the stamp after every stamping. Instead continue to stamp it 2-3 times for progressively lighter impressions. This adds depth to the overall design.


Step 4:
Cut out the pattern pieces from the PDF provided. Flip the painted and stamped bristol board over and trace the patterns on the reverse side with a pencil. Trace one body, two arms, and two legs, remembering to reverse one arm and one leg.


Step 5:
Using scissors meant for paper, cut out the pattern pieces from the painted and stamped bristol board.


Step 6:
Fold the body in half along the dotted line, as shown.


Step 7:
Using the Smooch pearlescent ink (which has an applicator brush in the cap) or another pearlescent and a small paintbrush, add the face to one side of the body piece, following the diagram on the pattern.


Even slight variations in line when drawing the face results in different facial expressions. Fun!


Step 8:
Paint the bamboo skewer with acrylic paint and set aside to dry.


Step 9:
Punch holes in the body, arm, and leg pieces, following the markings on the pattern, using an 1/8" hole punch, an awl, or a large needle.


Step 10:
Thread a large-eyed needle with three strands of embroidery floss. Tie a large knot in the doubled floss. Starting at the back of the body piece, sew each arm and leg in position with the arm or leg sandwiched inside the folded body piece. End with a large knot on the front of the body piece.


Step 11:
Apply glue to one end of the painted bamboo skewer and slide it up the center of the folded body piece. Set aside to dry.


Step 12:
Play or decorate with the completed Mixed-Media Paper Puppet!

*The pattern for the Mixed Media Paper Puppet:
Click on this image to embiggen and then print out at original size (8 1/2" x 11")


NOTE: Yes, it's Wednesday and not Tuesday. I had two more photos to shoot and ran out of daylight on Tuesday. And Tutorial Wednesday didn't have the same ring to it...


19 August 2013

B2B Mondays!

I'm excited to start a new feature on my blog - introducing Back to Business Mondays! Every Monday I'll be offering an art-related business tip to start your week off with an action you can take on your art career.


This week's tip is for all the smart phone and tablet users. Create a new photo album and upload some images of your most recent work into it. Then, when you meet someone who wants to know what you do and what kind of art you make, you'll be all ready to go and won't be scrolling through a million photos looking for the right ones. A little work up front will result in a more professional encounter! This is also a really excuse to make sure that you've taken photos of your recent work.

Remember when you're processing your photos to save the original image separately, and then, leaving that one untouched, save the image at different sizes and resolutions for various purposes (websites, blogs, Facebook, etc). You can always go back to that original, untouched image and create a new size or resolution as needed, without loss of image quality.


18 August 2013

Kimono Inspirations


My art quilt group, FiberArt Northeast, has an exhibit called Kimono Inspirations at the Art Quilt Gallery adjacent to the City Quilter in New York City for the month of August. 


Yesterday a group of us met at the gallery to celebrate the show. It was fabulous to see the kimonos hanging in a gallery - and they were hung absolutely beautifully - with such excellent lighting.


The first venue where we displayed the kimonos was our local quilt show and we constructed nearly 30 stands on which to hang them. Half of the stands are 36" high and half are 48" high. The kimonos were draped over the stands and could be walked around and viewed from both sides. This meant that both sides of a kimono were finished and some artists choose to have slightly (or very) different designs on each side. We were uncertain how that original intent (the double-sided kimono) would translate to hanging on a wall with only one side visible.


While many of them are just as interesting on the reverse side, we were thrilled with how well they worked hanging on a wall in the gallery setting. Four of the kimonos were displayed on our stands and showing the three-dimensional aspect of just a few of them really added to the exhibit.


The pieces aren't meant to be actual kimonos, but are inspired by the shape or form of a kimono. The guideline given to each artist was the size of the three pieces needed (the "sleeves" and "body" of the shape), and then they were given free reign in creating either surface-designed cloth in the appropriate sizes or actual stitched art quilts, or a combination of these. Some artists chose to stitch the three pieces together to form one unit, while others left them separate. Some works are sheer and layered and others are heavily quilted. Some are heavily embellished and others are not. A number of the artists chose to be inspired by Japanese imagery or techniques as well. The wide variety of expression is given cohesion by the common shape.

If you have an opportunity, please come visit the gallery to see the exhibit - now through August 31.