23 October 2015

One Room Challenge - Week three: Dresser and Nightstands

In case you've missed the shenanigans of the beginning of this One Room Challenge that I've undertaken, go here for part one and here for part two.

This week we refinished the dresser and gave the vintage mid-century nightstands a day of beauty. The dresser is one that my client loves - and with good reason, it has great lines and is a solid piece! It had been used in her sewing studio and was purple at the time and had silver handles. Here it is in its purple glory in the former studio (another room that's in the midst of a major makeover!)


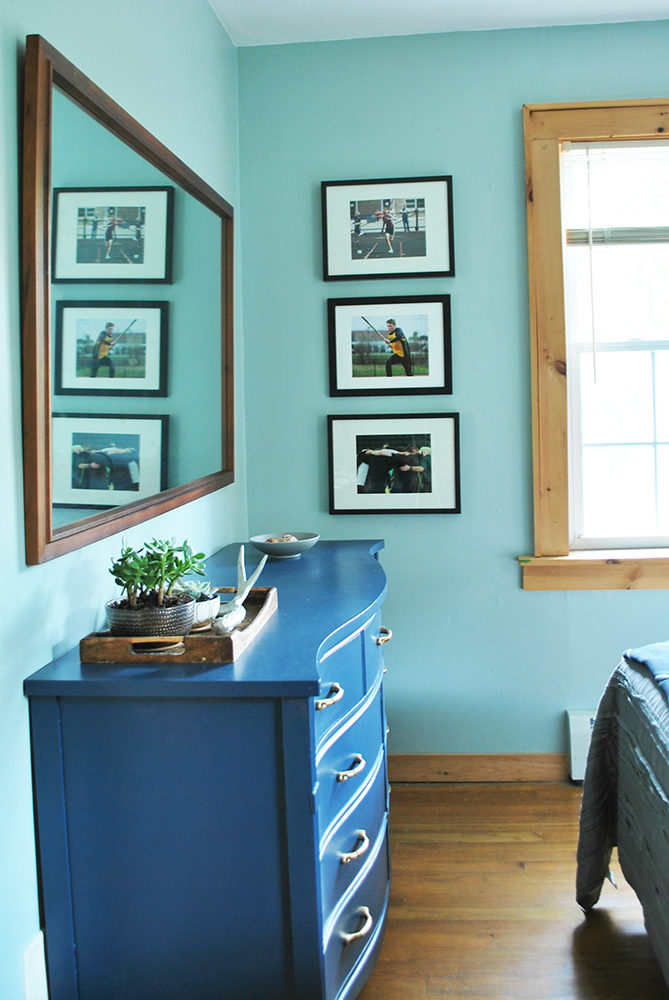
I chose a gorgeous deep blue shade for the dresser and my client jumped in and painted it.


I also chose some striking brushed gold handles to replace the outdated silver ones.


Here's a tip when painting furniture - add a little bit of Floetrol to the paint (found in the paint department). Brush strokes will flatten out and you'll end up with a really smooth, professional finish. My friend Tracey Anderson of Finished With Style shared that with me and it makes all the difference. I pour some of the paint into an empty container and then add a bit of Floetrol and mix well before applying the mixture with a brush or roller.


The only photo of the nightstands I have is an iPhone photo that I shot the day I started, my apologies - both for the grainy photo and the original Kermit the Frog green wall.


The nightstands were very dry, the finish was dull, and there were a few rings on the tops from drinks being left on them. I rubbed a coat of Feed N Wax into all of the surfaces of the nightstands, let them sit for about 20 minutes, polished with a clean cloth, and they came right back to life. Feed N Wax is beeswax, carnauba wax, and orange oil, and it smells good and works miracles.


I'll leave you with a sneak peek of the dresser in the room with the vintage mid-century mirror hanging above it. Art is even up on the wall! 


Next week is going to be tricky because I'll be in Houston teaching for 7 days starting on Monday, but I'll have at least a preview of what's coming next in this makeover.

Check out the other over 170 guest participants in the One Room Challenge, as well as the 20 invited participants. There are some amazing makeovers happening out there!

18 October 2015

One Room Challenge - Week Two, in which I build a headboard

It's week two of the One Room Challenge (you can read more about my first week and the beginning of my project here)

This week we painted the room. I chose a warm moody gray that reads blue-green depending on the light and the time of day. The color is an HGTV Home for Sherwin Williams color from Lowe's called Silvermist. It's the perfect background for all of the colors and textures that I'll be introducing to the room.


This week I also built a headboard to attach to the metal bed frame. I've added a tutorial below in case you'd like to build one too. I was lucky enough to be able to construct the entire thing of wood that we already had leftover from other projects (score!) but I'm including all of the wood on the materials list if you need to purchase yours. Not everyone has a huge pile of leftover wood just hanging around waiting to be used. Left outside, causing the neighbors and passersby to gossip. Count your blessings if you don't and bop over to the lumberyard to buy your wood! It should cost less than $75 total, which is a steal for a queen-sized headboard.


Materials:
  • Four pieces of 1" x 4" x 6' pine boards
  • Two pieces of 1/2" x 1.25" x 8' pine moulding strips
  • One package of thin tongue and groove pine paneling (Lowe's sells a package of six 8' boards for about $17)
  • Kreg jig (you could join the wood pieces other ways, but this is MUCH easier!)
  • Kreg screws (I used 1.25" coarse thread screws)
  • Walnut (medium brown) and Kona (almost black) stain
  • Nails, a hammer, and a nail set, or a nail gun
  • Sandpaper
  • Wood glue
  • Water-based polyurethane and a foam brush
  • Bolts and nuts that will fit through the holes on your bed frame
  • Drill and a drill bit the same size as the bolts
  • Wrench

I determined that I wanted the headboard to be 48" tall and 60" wide to fit a queen size bed frame. I cut two of the 1" x 4" x 6' pine boards to 48" long for the sides of the headboard. I saved the ends (just shy of 24" each) for the inner braces. I cut the other two 1" x 4" x 6' pine boards to 54" long for the top and lower pieces of the headboard. I laid everything out on the floor of the garage to check the size and scale.


I used the Kreg jig to make the joining holes in each of the pieces of wood, and then attached the frame together with the Kreg screws. The advantages of the Kreg jig joints are speed, ease, and the tightness of the joints. I'm a fan!


Once the frame was assembled, I cut the tongue and groove paneling boards to 54" long each. Save the leftover ends to piece the length of the very bottom rows, which won't show because they'll be below the mattress edge and the pillows. Starting at the top and keeping all of the edges flush, begin nailing the paneling boards to the frame of the headboard. I used a nail gun but you could use fine nails, a hammer, and a nail set to recessed the nail heads for a cleaner finish. If you use the same paneling boards that I did, you'll notice that I used them upside down, that is, the back of the boards is what I used facing front. I loved the smaller grooves on this side of the wood (and this wood was leftover from another project so the fronts were already painted - see a peek of it below).


I carefully nailed into the grooves so the nail holes wouldn't be as noticeable.


Once the paneling was nailed on, I took the headboard outside for an all-over sanding to prepare it for staining.


The first coat of stain was much too light, so I ended up mixing two cans of stain together to get a darker, richer color.


Once the stain was dry, I measured and cut the 1/2" x 1.25" x 8' pine moulding strips to fit around the two sides and the top of the headboard, mitering the corners. Before I attached the strips to the headboard I stained them with a dark, almost black, Kona stain and let them dry.


Once the strips were dry, I added a bead of wood glue to the top of the headboard, positioned the top strip in place and nailed it. I repeated this with both the left and right sides. The back of each moulding strip was flush with the back of the headboard so the front edge protruded forward of the front of the headboard, forming a nice frame.


Once the headboard was completely assembled I coated it with three coats of water-based polyurethane, sanding between each coat.


I lined the headboard up against the metal bed frame and marked the holes on the wood.


I drilled holes where I made the marks large enough that the bolts would go through. I attached the headboard to the metal bed frame with three nuts and bolts on each leg and tightened them with a wrench. I threaded the bolts through the wood leg first so the head of the bolt was on the back of the leg and the nut was on the inside of the metal frame. This enables the headboard to sit flush against the wall without the bolt ends gouging the wall or getting in the way. It did make it a little trickier to tighten the nuts down, especially the ones below the box spring. Picture me on my stomach on the floor, with not enough light under the bed, tightening those nuts by feel. Copious cursing in several languages helped.


A shot of the back of the headboard - the paneling was leftover from a planked feature wall that I built in my clients' dining room! I used the planks on the headboard on the reverse side because I liked the grooved detail. It's fun having that surprise in the back of the headboard and it's even more fun that I used leftover wood to make it.


Here's the headboard attached to the bed frame, in place in the room. I love the colors and how clean and modern it looks!


And here's a sneak peek at the new headboard with the pillows - I couldn't resist seeing how it all looks together. I'll go into more depth about the room's textiles in another week.

I just heard that the rug arrived. I found an amazing deal on the CB2 website (6' x 9' rugs are harder to find than 5' x 8' so the hunt was extensive) but the rug was backordered, so it's a relief to know that it's arrived. Trying to pull this room together, between building things and waiting for things ordered to arrive, in six short weeks is nerve wracking!

11 October 2015

One Room Challenge - A Young Manly Makeover

I mentioned earlier this summer that I've been taking on some interior design/decorating projects, in between traveling to teach all over the country and in my studio, and working on a new book, because sleep is over rated! Ha!! Plus I'm having a blast and have been working on a line of hand printed textile designs that I'm unleashing on the world.
One of these decorating/design projects is a whole house redesign that I'm project managing (handling the contractor, electrician, plumber, inspections, etc for a bathroom addition and kitchen remodeling/redesign) and planning the interiors for every room, integrating existing furniture with new furniture, updating finishes, and bringing cohesion with a new, fresh style to the house, a style that we're calling "organic modern industrial". This week I am starting on a bedroom for the son of the family, a delightful 20 year old who's off at college and needs an updated room to come home to on holidays, a room that guests will also feel comfortable in.


I have followed the One Room Challenge (ORC), a six week blogging design challenge dreamed up and hosted by Linda of Calling It Home, and have always thought about participating. Twenty well known design bloggers are invited to make over one room in their houses (in six fast action-packed weeks!) and they blog about their progress each Wednesday. Anyone else who'd like to play along can link up and blog on Thursdays so I decided to jump in and work on "A Young Manly Makeover", the 20 year old college athlete's room, for my first spin at the ORC.

Currently the room is painted a bright shade of Kermit-the-Frog green and has spray-painted graffiti designs on two walls. Some of the furniture (that isn't staying) has already been removed. Luckily there are a few excellent pieces of furniture that are staying - two mid-century modern nightstands, a curved painted dresser (that will be getting a makeover itself), a mattress and boxspring on a metal bed frame (but no headboard), and a mid-century modern desk. Great building blocks to start with! The mandate is to create a cozy modern room that's updated with a new color palette for a young man; to keep it masculine and warm; to reuse the family's mid-mod furniture; and to stick to a budget - so I'll be building and hacking a few things to stay on track.

Here are the before photos of the room:


First up, we need a plan! I put together a moodboard to give the family an idea of how the room could look. Most of the items on the moodboard are suggestions of the look and feel we're going for, although I have started to source a few things exactly, like the pictured brushed gold lamps for the nightstands. They're from Target and if you love them as much as I do, don't wait to order them because they're disappearing from stores and from the Target app so their days are numbered. *sniff*


I hope you follow along to see how the room progresses! It's going to be challenging because this month I'm also preparing to teach in Houston, Texas at the end of October - a week's worth of workshops, including How to Film and Edit Your Own Videos, Social Media Bootcamp, and How to Get Published. It's going to be a wild ride!!

03 August 2015

Printed Fabric Bee - Insects theme

I am the "Queen Bee" for the month of August of the Printed Fabric Bee group. That means that I got to choose the theme and the size for the fabric this month. Naturally, I chose insects as my theme.

Each of the Printed Fabric Bee members have made a 6" square fabric for me to giveaway to a lucky reader. If you would like to win these lovely fabrics, please leave a comment on this blog post, or on the Printed Fabric Bee blog before August 15 for a chance to win. Buzz on over!

Check out a sampling of the creative fabrics made by the members in this month's collage.


The guidelines to go along with my insect theme this month were an artist's choice of colors, with a touch of black. For my own fabric, I started by painting a solid white fabric with a wash of diluted Liquitex ink, then printed the hexagonal shapes on top with a yellow ochre Neopaque acrylic paint, and finally added the bees with another block print and a black Neopaque acrylic paint. Bees are among my favorite insects for their industriousness, their strong community, and the beauty in the function of their honeycombs. What is your favorite insect and why?


Check out the other Bee member's blogs for insights into their favorite insects too!

Carol R. Eaton
Jackie Lams
Lynda Heines
Gerrie Congdon
Susan Purney Mark
Deborah Boschert
Jane Davila
Lisa Chin
Lynn Krawczyk
Leslie Jenison
Judy Gula 
Julie B. Booth


06 July 2015

New "Vintage" fabric for the Printed Fabric Bee

June's theme for the Printed Fabric Bee is "Vintage". I created a piece of fabric by hand painting a background with acrylic ink. Then I added a stencil that I had cut with a slightly irregular striped pattern. I sprayed through the stencil with an ochre pearlescent acrylic ink.

And finally I used a classic, and actually vintage from the 1970s, number stencil and a pewter metallic acrylic spray ink for the top layer of surface design.


You can leave a comment on Lynn's blog or on the Printed Fabric Bee's Facebook page by July 10 for a chance to win a set of 6" squares from each of the Bee members.


05 May 2015

Lyric Kinard's new Thermofax 101 DVD + a Giveaway

Have you ever printed with a Thermofax screen? Have you wondered what all the hype among fiber artists is for these printing goodies? My friend Lyric Kinard comes to your rescue with her new one-hour DVD called Thermofax 101. I've had the pleasure of working with Lyric in the past and I can tell you that she is an excellent and patient teacher. She explains things in a very approachable way and this DVD is the next best thing to having her at your elbow while you learn how easy it is to screen print on fabric with a Thermofax screen.


Lyric walks you through the fundamentals of designing imagery for your own screen, getting one created (she lists sources - it's so affordable!), the supplies you'll need, and how to print on fabric. You'll be amazed at how much fun it is and how quickly you can print unique, original fabric, in just the colors and patterns that you want.

This is a bee that I printed with a Thermofax screen! So fun!!

To celebrate the release of her new DVD, Lyric is giving away copies at each stop on the blog hop (the complete list is below - enter at each stop for the most chances to win). 

Leave a comment here before midnight on Monday, May 11 and tell me what is your favorite imagery to print - mine is insects (quelle surprise!) And remember to add your email address so I can contact you if you win - Lyric is shipping prizes to international readers too, so c'mon Aussie friends! Enter here and at each stop on the blog hop, there are 17 chances to win!

This blog tour is chock-a-block full of so many fabulous fiber artists and I just noticed that my friend Judy Gula is one of them. Judy and I will both be teaching in a few weeks at the Quilters Unlimited show, the biggest and best show in the DC area. You can see a complete list of the classes that I'm teaching on the QU website

Here are all the fun stops on the Thermofax 101 Blog Hop:
April 24 Cheryl Rezendez  
April 25  Leslie Tucker Jenison   
April 28  Sue Bleiweiss  
April 30  Judy Gula  
May 2  Judy Coates Perez  
May 5  Jane Davila  (You're here now!)
May 6 Melanie Testa 
May 7  Liz Kettle  
May 8  Carol Sloan  
May 9  Kathy York  
May 12  Desiree Habicht  
May 13  Jamie Fingal 
May 14  Deborah Boschert  

May 15  Sarah Ann Smith  


21 March 2015

International Quilting Weekend and a chance to win!


In honor of International Quilting Weekend, March 20-22, 2015, TheQuilt Show, the web TV show hosted by Alex Anderson and Ricky Tims, will open all of its shows from the first nine series-- shows 100-1513 --for the entire weekend. This means that, for three special days, everyone will have the chance to view over 200 shows, featuring some of the quilting world’s leading artists, for FREE. 

This year's sponsors are contributing over $5000 in prizes, including the Grand Prize, a BERNINA 550 QE.  Other prizes you have a chance to win are:

         Innova – Have your quilt professionally quilted ($500 value)          Superior Threads – five $100 gift certificates          RJR Fabrics – a Delicious Selection of RJR Fabrics          AccuQuilt – GO! Big Electric Fabric Cutter          Missouri Star Quilt Company – $500 in Quilter’s Cash plus signed copies of Volume 1 of Block Magazine and Man Sewing Swag


As you may already know, I appeared as the featured artist on TQS in show 208. If you didn't have the opportunity to see this show the first time around, now you'll have the chance to see it—and so many other terrific shows—at no cost in this unprecedented three-day offer.
I hope that you'll share this information with all of your quilting friends. It's a fantastic opportunity to enjoy three days of learning and fun without leaving your home…all for free.Enjoy the shows, and thanks for helping to spread the word!

I had a fantastic time in Colorado taping the episode I appeared in and meeting Alex and Ricky. I shared a lot of information about the principles and elements of design from the first book that Elin and I wrote, and lots of the art quilts that were in it. The experience was wonderful - even the bear I saw outside the hotel at 4 AM!
Link to TQS website landing page:  http://thequiltshow.com/international-quilting-weekend